The Tenant File Property Management Software allows users the ability to keep track of up to ten Bank Accounts within each installation. Whether you are posting expenses or posting rental income, the process can be completed directly by creating checks and deposits.
Of course, you have the flexibility of posting transactions directly to your ledgers; however, by utilizing the Checks/Deposit function of the program, you can complete all postings while keeping a separate bank Register on each account. In addition to creating checks and deposits, you have the ability to ‘Reconcile’ your accounts each month against Bank Statements.
How to create a check…
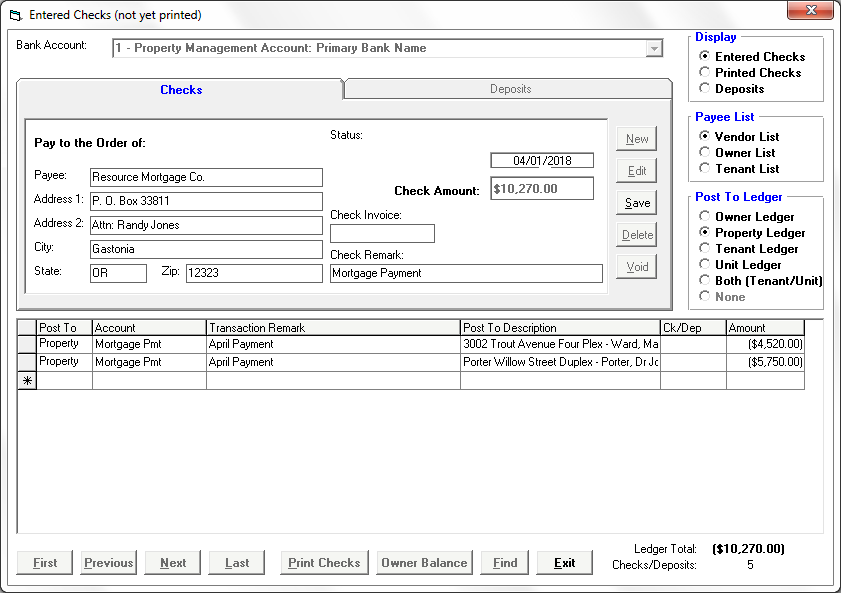
To create a new check, click into the ‘Checks/Deposit’ button from the Main Menu. Any checks that you have previously entered but not yet printed will display on your screen.
The Command Buttons on the side of the check will allow you to add a ‘New’ check, ‘Edit’ an existing ‘Entered’ check, ‘Delete’ a check, enter a ’Split’ transaction detail on a new check, or ‘Void’ a check.
Select Bank Account – At the top of the check screen, you will need to select one of the ten Bank Accounts for the check you are entering. Upon entering a new check or deposit, the default bank account will always be your ‘Primary’ Bank Account. If you maintain separate accounts for your Owner, it is very important that you choose the correct account at the onset.
To enter a New Check, press the ‘New’ button and enter the following information:
Pay to the Order Of – Make your selection directly from the ‘Payee List’ on the right side of the screen (Vendor List, Owner List or Tenant List). By selecting the name from the list (and not typing in the name) it will allow for consistency when looking for a payee name or when creating your 1099 MISC forms at the end of the year.
If the same name is spelled two different ways, the program will consider that as two different Vendors, for example. In addition, selecting from the list will automatically include the address for the check. If the check that you are creating is for a new Vendor that you have not yet setup, you can click into ‘Vendors’ under the ‘Payee List Box’ and click ‘Add Vendor’.
Date – Your current date is displayed, however, you can change this date by clicking onto the ‘Date’ field and enter the date that you want printed on the check.
Amount – The amount of your check will be automatically calculated from the total of the ‘splits’ that you will enter in the transaction grid at the bottom of the check. Note: You do have the option to create a check that is not to be posted to any ledger. In this case, you would select the ‘Post to Ledger’ Status as ‘None’ and then would be required to enter an amount in the field.
Invoice – User entered Invoice number.
Remark – User entered remark. This remark is for the entire check. Each split for this check has a remark that will be posted to the transaction ledger.
Post To Ledger – When posting transactions into the Tenant File, you must indicate the type of ledger that the transactions are to be posted. Any transaction that applies to a specific rental unit (such as fixing the sink in unit A of a duplex) needs to be posted to the Unit Ledger (including single family homes). Any transaction that applies to the entire ‘property’ (such as Lawn Care or maintaining the pool at an apartment building) should be posted to the ‘Property Ledger’. Lastly, any transaction between you (the Manager) and the owner of the property should be posted to the Owner Ledger.
Postings to be charged to the Tenant will go to either the Tenant Ledger (if it only affects the Tenant, such as ‘Repairs & Maintenance’ that the Tenant is responsible for) or to ‘Both (Tenant and Unit Ledgers)’ if it affects ‘Both’ the Tenant AND the Owner. Whichever type of Ledger that you select in the ‘Post to Ledger’ selection will determine which expense accounts will be accessible in the drop-down under the ‘Accounts’ column.
Lastly, if you need to create a check that is not to be posted in any Ledger within the Tenant File program, there is a selection called post to ‘None’. If you are going to utilize the Check/Deposit section of the program and intend to Reconcile your Bank Account(s) with the program, you should always create a check for the posting rather than posting directly into the Ledger.
Entering the Split Transactions for the Check: On the bottom half of the screen, you will enter the transactions for each check. Every check will have at least one row, unless you have selected the ‘Post To’ status of ‘None’ and will not post the check to any ledger.
Complete each column of the row and move to the next line to add more splits for this check. After making a change or adding a row, you must click on another row (above or below) to save the current row.
You are able to post transactions to different types of ledger (such as a Property Ledger and a Unit Ledger) within the same check by changing the ‘Post to Ledger’ Status. Simply save the current row and then click on the ‘Post To Ledger’ option box to change the Ledger type. You can create multiple postings to multiple ledgers from a single check. Once you have completed the check, click on the ‘Save’ button prior to exiting.
How to print a check….
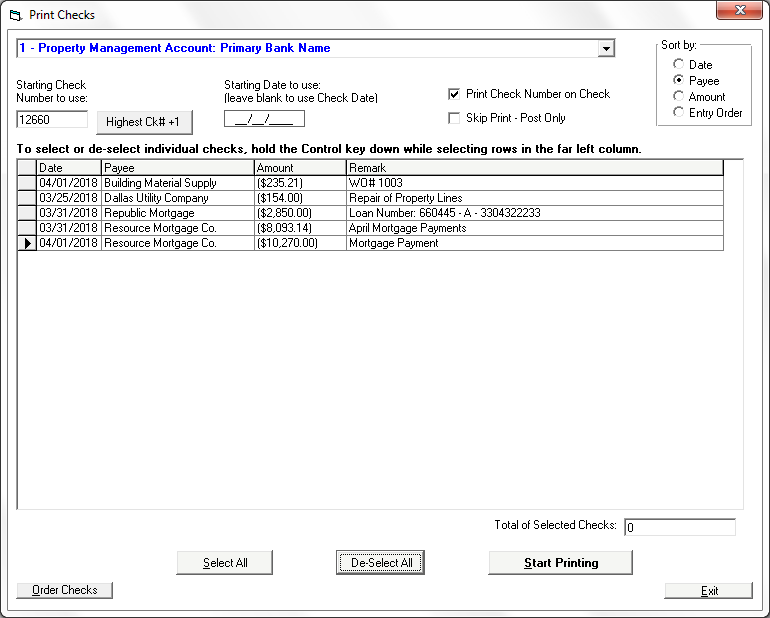
The transactions associated with Entered checks are not posted to the ledgers until you actually print the checks. To print one or more of your Entered checks, click into the CHECKS/DEPOSITS button and click on the selection at the bottom of the screen called ‘Print Checks.
Once you select the correct ‘Bank Account’ from the drop-down list, you will see your list of entries in the ‘Entered Check’ file for that particular Bank Account. To select or de-select all checks, click the correct button at the bottom of the screen. If you just want to print individual checks from the list, hold down the ‘Control’ key (Ctrl) and click on the rows you want to include.
Starting Check Number to use: The Tenant File will remember the last check number printed, but be sure to look at your check stock and edit the field accordingly.
Starting Date to use: Leave this field blank to use the date that was entered on the check. You can choose to change the date of the printing if you need to.
Print Check Number on Check: If checked, this will print the check number in the upper right area of the check. All pre-printed checks have the number included on the check stock, therefore, if you wish, you can remove the check mark to prevent the number form printing.
Skip Print – Post Only: This selection will do everything normally done when printing a check, except that the checks will not be sent to your printer. Users that want to keep track of their Bank Account(s) but do not print checks will use this function to post the transactions and show the printed checks in their ‘Bank Register’.
Start Printing: Click this button when you are ready to print your entered checks. Once the checks are printed, you will want to view them to make sure that they printed correctly. The program allows you to ‘Reprint’ the checks if your printer didn’t print the checks correctly or you want to modify the check(s) prior to posting to the ledger. In the pop-up, if you answer that you want to reprint your checks, all of the checks will remain as ‘Entered Checks’ and transactions will not post to your ledgers. In that case, you would make the necessary changes and reselect and reprint the checks. If you answer ‘No’ (that you do not need to reprint), all selected checks will be transferred to the ‘Printed’ check file and the transactions will be posted to the appropriate ledgers. Once moved to the ‘Printed’ check file, you cannot edit or re-print the checks.
How to create a Deposit …
To create a new deposit, click into the ‘Checks/Deposit’ button from the Main Menu and change the DISPLAY (on the upper right corner) to DEPOSITS. Select the correct ‘Bank Account’ from the drop-down Menu on the top of the screen prior to entering a new deposit.
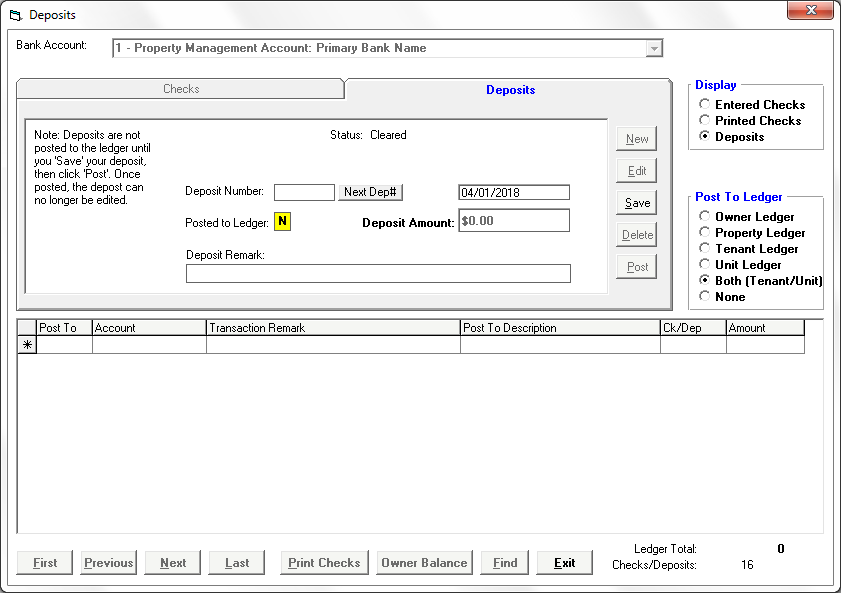
To enter a new Deposit, click NEW. You would then want to enter a ‘Deposit Number’ for the new deposit. We highly suggest that a number be created since the Deposit number ties the potentially multiple ‘split transactions’ when searching for a deposit and in multiple reports.
Enter the date and a ‘Remark’. Just like checks, you can post transactions from a deposit to different types of ledgers, such as a mixture of postings for an Owner, Property, Unit, or Tenant all in one deposit. To do this, just click on the correct ledger under the ‘Post To Ledger’ option, and then enter the information in the transaction row. Once the information is completed on each row, click down to the next row to save the information and update the ‘Deposit Amount’ field.
After entering all entries for the deposit, click the SAVE button. Once saved, you can choose to post the deposit transactions to the appropriate ledgers immediately or keep the deposit open to add new transactions at a later time.
It is very important to remember that transactions will not post to your ledgers unless you click to POST the deposit. Therefore, if you choose to SAVE the deposit and need to EDIT the information prior to posting, you MUST remember to go back to the deposit and click POST when complete. The field in yellow next to ‘Posted to Ledger’ will either indicate an ‘N’ stating that it has not been posted or a ‘Y’ once it has been posted. Once you click to POST the deposit, all related transactions are posted to the ledger(s) and you can no longer edit the information.
At the end of each month, if you choose, you can RECONCILE your Bank Account(s) to your Bank Statement.
How to Reconcile…
Step 1: Display the Bank Register by clicking on the REGISTER button from the Main Menu.
Step 2: Select the correct ‘Bank Account’ from the drop-down list that you wish to reconcile. Your main Property Management Account is the default account that will always show when you click into the Register. Click the drop-down and select a different account if you are not balancing your main account.
Step 3: Click ‘Add Register Charges and Credits’ to enter in any bank fees (i.e. monthly service fees) as a DEBIT and bank income (i.e. Interest Earned) as a CREDIT.
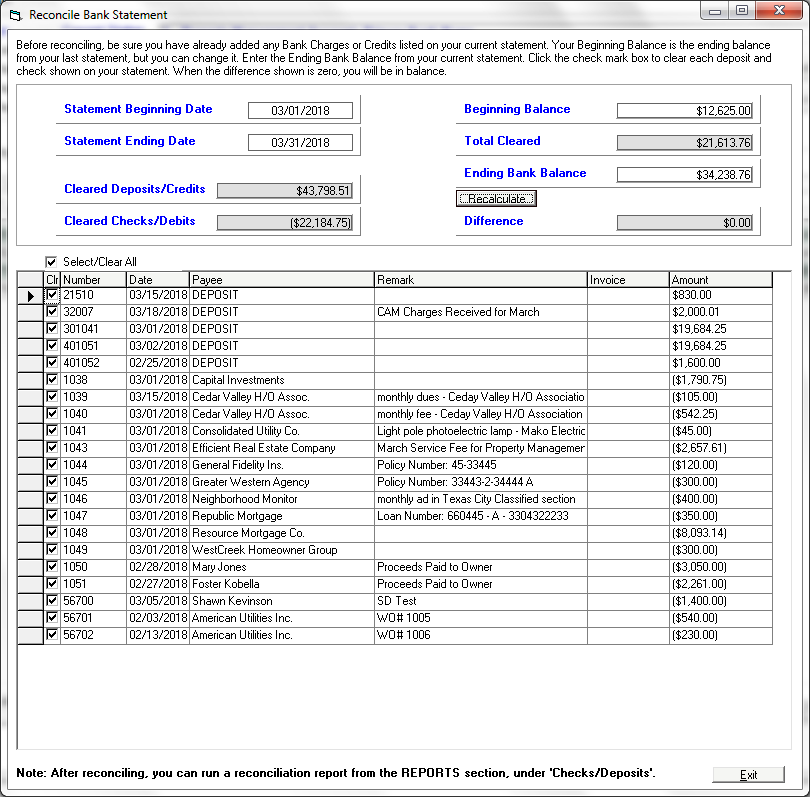
Step 4: Click the ‘Reconcile’ button. The Beginning Balance field will be the total of all previously reconciled checks and deposits.
Step 5: Find the Ending Balance on your Bank Statement and enter it in the ‘Ending Bank Balance’ field.
Note: You will see a display of all checks and deposits that are currently PENDING, including any bank charges and credits that you have just entered. Only checks that are marked PENDING and not CLEARED will display.
If you manually changed the ‘Status’ in the Bank Register of any checks or deposits to ‘Cleared’, you would not be able to complete a reconciliation until you change any checks marked ‘Cleared’ in error.
Step 6: Compare the list in the Reconciliation section to the checks and deposits that have cleared your bank. Find all checks and deposits that match the transactions on the statement and click the transaction to mark it as ‘Cleared’ on this screen.
Note: Make sure that the transaction that you clear matches exactly (dollar and cents) to the amount listed on the statement. If you determine that some amounts do not match exactly, you will need to leave the Reconciliation section and correct the transactions.
Once corrected, click into RECONCILE and follow the above instructions. Likewise, if you find a transaction on your Bank Statement that is not shown in the listing in the Reconcile, you will need to leave the Reconciliation section and find the transaction that was not entered into the Tenant File. Once you have entered the transaction, click into REGISTER and RECONCILE and follow the above instructions.
Note: Once you have cleared all checks and deposits and have verified that they match all checks and deposits that have cleared as per your Bank Statement; the total will be calculated and entered into the CLEARED field of your Reconciliation window.
Note: The difference between the Ending Balance plus all Cleared checks and deposits and the Ending Bank Balance will display in the window called DIFFERENCE.
Step 7: If the amount is $0.00, you have successfully reconciled the Tenant File checking account with your Bank Statement. To print a Reconciliation Report, exit this section, go to REPORTS > CHECKS/DEPOSITS report type > Check Reconciliation (Cleared).
Note: If the amount is not zero, your Tenant File Account is not in balance with your Bank Statement. You will need to determine if there are any checks or deposits that have not been entered into the Tenant File but show up as a Cleared transaction in your Bank Statement.
Or you may have a check or deposit that was cleared in error in the Tenant File register but does not show up in your Bank Statement. You would need to exit the Reconciliation Section and correct any mistakes.
How to order Checks and Deposits…
The Tenant File supports a number of common check formats, but in order to be guaranteed compatible, checks can be ordered from our website at www.TenantFile.com > PRODUCTS > CHECKS AND SUPPLIES where you can view our pricing and download an Order form.
Checks are available in a number of colors and styles. Our turnaround time is fast and the prices beat other major check printing companies.
In addition to checks, we offer great pricing on Deposit Booklets, printable Deposits, Endorsement Stamps and Address Stamps. The styles available that are compatible with the Tenant File include ‘Check on top – with two vouchers per page’, ‘Check in the middle – with a voucher above and below the check’ and ‘3-on-a-page checks with no voucher.
As a service to our customers, we have been able to keep our pricing low throughout the years that we have offered check printing to our customers.
DirectPAY Option …
An option to consider in finding the best way to save time and money and to prevent the necessity of creating deposits for rental income and creating and printing checks to your Vendors and Owners, is to sign up with DirectPay. As a busy Property Manager, wouldn’t it be great to click into your software program and see that your Tenants have paid you online and all transactions were posted?
The Tenant File Property Management Software has an affiliation with REVO Payments which allows Tenant File users to add online rent payment and bill processing to your property management process. You can break through the standard eight-hour leasing office day and keep payments coming into your office at any time.
With the Tenant File Property Management Software, you’ll be able to use DirectPAY to set up an online payment system with your tenants, affording your tenants 24 hour convenience, and helping you to get your rents in a timely fashion.
With DirectPAY, you will be able to receive rent payments online 24 hrs a day/7 days a week which will automatically post to the Tenant’s Ledgers. The process will save you the time that it takes to process checks received, create bank deposits and post to the program. It is all completed by the automated process. Once you sign up with DirectPay, they will create a custom, branded payment page that’s optimized for any device – PC, tablet or smartphone – to accept eCheck, credit and debit card payments.
Your tenants will appreciate the ability to take care of their obligations of paying rent by eCheck, Credit Cards, or recurring payments directly to your website for a small transaction fee processed directly to your Tenants.