The Virus is Coming

Virus is Coming Image

There is a virus that is lurking around the corner. This is one that will have devastating effects on our economy, business, and our personal lives. The virus is nearly undetectable until it has done its damage.

We may not even know that it has spread throughout the country until it’s too late. There is no news because the Internet is down, there is no radio or TV. By that time, the stores are empty, there is no gas at the filling stations, no electricity in your home, and you are in a panic.

What is this horrible virus that has shut down everything? It’s not a living organism – it’s a computer virus that was unleashed by a massive cyber-attack on our infrastructure.

Do you think that could never happen? Ask yourself – did you think we could ever be hit with a viral pandemic that would effectively shut down the entire country for months on end? Would you have imagined that we’d still be wearing masks everywhere, including in schools? I’m not saying that COVID-19 was intentional, but bio-virus attacks have been predicted for years. Regardless of the source or motive, the result is the same. America and countries worldwide have been brought to their knees. And it is still happening right now …

The other kind of virus is the computer virus. We have been doing battle with this one for many years now, and the onslaught of attacks is relentless. Think you are protected? Think again. Here are a few of the cyber-attacks just in the past year – so far:

SOURCE: Center for Strategic and International Studies

August 2021. A cyberattack on the government of Belarus has compromised dozens of police and interior ministry databases.

August 2021. A hacking group targeted a high-profile Iranian prison, uncovering documents, videos, and images that displayed the violent treatment of its prisoners.

August 2021. A cyber-espionage group linked to one of Russia’s intelligence forces targeted the Slovak government from February to July 2021 through spear-fishing attempts.

August 2021. Russia targeted and blocked content on “smart voting” app created by Kremlin critic Alexei Navalny and his allies intended to organize voting against the Kremlin in next month’s parliamentary elections.

August 2021. T-Mobile suffered a data breach that led the hacker to access the personal details of over 50 million people. The hacker stated he discovered an unprotected router exposed on the internet allowing him access to the network.

August 2021. Hacks initially attributed to Iran in 2019 and 2020 were found to be conducted by Chinese operatives. The cyberattack broke into computers across Israel’s government and tech companies.

August 2021. In one of the largest cryptocurrency heists, a hacker stole around $600 million from Blockchain site Poly Network. The hacker then returned $340 million directly and transferred $268 million to a digital wallet jointly controlled by them and Poly Network. However, the funds in the wallet remain inaccessible until the hacker provides the digital key.

August 2021. A cyberattack on the Covid-19 vaccine-scheduling website for the Italian region of Lazio forced the website to temporarily shut down. New vaccination appointments were unable to be scheduled for several days after the attack.

August 2021. Various Chinese cyber-espionage groups are responsible for the hacks of at least five major Southeast Asian telecommunication providers beginning in 2017. The attacks were carried out by three different hacking groups and are seemingly unlinked despite all groups having a connection to Chinese espionage efforts.

July 2021. A data leak impacted Northern Ireland’s COVIDCert online vaccination certification service, causing their Department of Health to temporarily suspend the portal.

July 2021. Estonia stated a Tallinn-based hacker downloaded 286,438 ID photos from government database, exposing a vulnerability in a platform managed by their Information System Authority (RIA).

July 2021. A widespread APT operation was discovered against users in Southeast Asia, believed to be spearheaded by Chinese entities. Researchers found a total of 100 victims in Myanmar and 1,400 in the Philippines, including many government entities.

July 2021. The Japan 2020 Olympics was subject to data breach exposing the personal credentials of volunteers and ticket holders. The information included usernames, passwords, addresses, and bank account numbers.

July 2021. The United States, the European Union, NATO and other world powers released joint statements condemning the Chinese government for a series of malicious cyber activities. They attributed responsibility to China for the Microsoft Exchange hack from early 2021 and the compromise of more than 100,000 servers worldwide.

July 2021. Transnet Port Terminals (TPT), South Africa’s state-run ports operator and freight rail monopoly, had its rail services disrupted after a hack by unknown actors. Transnet reportedly declared it an act “force majeure.”

July 2021. Several countries used Pegasus, surveillance software created by NSO Group that targets iPhone and Android operating systems, on devices belonging to activists, politicians, and journalists.

July 2021. The FBI and the U.S. Cybersecurity and Infrastructure Security Agency (CISA) released a statement exposing a spearfishing campaign by Chinese state-sponsored hackers between 2011 and 2013. The campaign targeted oil and natural gas pipeline companies in the United States.

July 2021. Iran used Facebook accounts to pose as recruiters, journalists, and NGO affiliates, targeting U.S. military personnel. The hackers sent malware-infected files or tricked targets into submitting sensitive credentials to phishing sites.

July 2021. The Russian defense ministry claimed it was hit with a DDoS attack that caused its website to shut down, stating the attack came from outside the Russian Federation.

July 2021. Norway attributed a March 2021 cyberattack on parliament’s e-mail system to China.

July 2021. Iran’s transport and urbanization ministry was the victim of a cyber-attack that impacted display boards at stations throughout the country. The attack caused delays and cancellations of hundreds of trains across Iran.

July 2021. Russian hackers exploited a vulnerability in Kaseya’s virtual systems/server administrator (VSA) software allowing them to deploy a ransomware attack on the network. The hack affected around 1,500 small and midsized businesses, with attackers asking for $70 million in payment.

July 2021. The Ukranian Ministry of Defense claimed its naval forces’ website was targeted by Russian hackers who published fake reports about the international Sea Breeze-2021 military drills.

June 2021. Russia claimed that Vladimir Putin’s annual phone-in session was targeted by DDoS attacks.

June 2021. A Chinese-speaking hacking group spearheaded an ongoing espionage effort against the Afghan government through phishing emails. Hackers posed as the Office of the President of Afghanistan and targeted the Afghan National Security Council (NSC).

June 2021. The Iranian government launched a wide scale disinformation campaign, targeting WhatsApp groups, Telegram channels and messaging apps used by Israeli activists. The campaign aimed to advance political unrest and distrust in Israel.

June 2021. Chinese actors targeted organizations, including Verizon and the Metropolitan Water District of Southern California using a platform used by numerous government agencies and companies for secure remote access to their networks.

June 2021. Hackers linked to Russia’s Foreign Intelligence Service installed malicious software on a Microsoft system that allowed hackers to gain access to accounts and contact information.

June 2021. The U.S. and British governments announced the Russian General Staff Main Intelligence Directorate (GRU) used a series of brute force access attempts against hundreds of governments and private sector targets worldwide from 2019 to 2021, targeting organizations using Microsoft Office 365® cloud services.

June 2021. United States Naval Institute (USNI) claimed the tracking data of two NATO ships, the U.K. Royal Navy’s HMS Defender and the Royal Netherlands Navy’s HNLMS Evertsen, was falsified off the coast of a Russian controlled naval base in the Black Sea. The faked data positioned the two warships at the entrance of a major Russian naval base.

June 2021. A cyberattack reportedly from Russia targeted more than 30 prominent Polish officials, ministers and deputies of political parties, and some journalists by compromising their email inboxes.

June 2021. Sol Oriens, a small government contractor that works for the Department of Energy on nuclear weapons issues, was attacked by the Russia-linked hacking group REvil.

June 2021. A spreadsheet was leaked containing classified personal details of the 1,182 United Kingdom’s Special Forces soldiers on WhatsApp.

June 2021. A ransomware attack targeted iConstituent, a newsletter service used by U.S. lawmakers to contact constituents.

June 2021. Hackers working on behalf of Russian intelligence services are believed to have hacked Netherlands police internal network in 2017. The attack occurred during the country’s investigation of the Malaysia Airlines Flight 17 (MH17) that was shot down in 2014.

May 2021. LineStar Integrity Services, a pipeline-focused business, was hit by a ransomware attack the same time as the Colonial Pipeline, with 70 gigabytes of its internal files being stolen.

May 2021. A North Korean cyberattack on South Korea’s state-run Korea Atomic Energy Research Institute (KAERI) occurred through a vulnerability in a vendor’s VPN.

May 2021. The world’s largest meat processing company, Brazilian-based JBS, was the victim of a ransomware attack. The attack shut down facilities in the United States, Canada and Australia. The attack was attributed to the Russian speaking cybercrime group, REvil.

May 2021. On May 24th, hackers gained access to Fujitsu’s systems and stole files belonging to multiple Japanese government entities. So far four government agencies have been impacted.

May 2021. Cybersecurity researchers identified a North Korean hacking group to be responsible for a cyber espionage campaign, targeting high profile South Korean government officials, utilizing a phishing methodology. The group’s targets were based in South Korea and included: the Korea Internet and Security Agency (KISA), ROK Ministry of Foreign Affairs, Ambassador of the Embassy of Sri Lanka to the State (in ROK), International Atomic Energy Agency Nuclear Security Officer, Deputy Consul General at Korean Consulate General in Hong Kong, Seoul National University, and Daishin Securities.

May 2021. On May 14, Ireland’s national health service, the Health Service Executive (HSE), was the victim of a ransomware attack. Upon discovering the attack, government authorities shut down the HSE system. The attackers utilized the Conti ransomware-as-a-service (RaaS), which is reported to be operated by a Russia-based cybercrime group.

May 2021. The FBI and the Australian Cyber Security Centre warned of an ongoing Avaddon ransomware campaign targeting multiple sectors in various countries. The reported targeted countries are Australia, Belgium, Brazil, Canada, China, Costa Rica, Czech Republic, France, Germany, India, Indonesia, Italy, Jordan, Peru, Poland, Portugal, Spain, UAE, UK, US. The targeted industries include: academia, airlines, construction, energy, equipment, financial, freight, government, health, it, law enforcement, manufacturing, marketing, retail, pharmaceutical.

May 2021. On May 6, the Colonial Pipeline, the largest fuel pipeline in the United States, was the target of a ransomware attack. The energy company shut down the pipeline and later paid a $5 million ransom. The attack is attributed to DarkSide, a Russian speaking hacking group.

May 2021. On May 4th and 5th, the Norwegian energy technology company Volue was the victim of a ransomware attack. The attack resulted in the shutdown of water and water treatment facilities in 200 municipalities, affecting approximately 85% of the Norwegian population.

May 2021. A large DDoS attack disabled the ISP used by Belgium’s government, impacting more than 200 organizations causing the cancellation of multiple Parliamentary meetings

May 2021. A Chinese hacking group compromised a Russian defense contractor involved in designing nuclear submarines for the Russian navy.

April 2021. A hacking group compromised the social media accounts of Polish officials and used them to disseminate narratives critical of NATO. German authorities have reported that the same group has also attempted to compromise members of the Bundestag and state parliament.

April 2021. Hackers linked to the Chinese military conducted an espionage campaign targeting military and government organizations in Southeast Asia beginning in 2019

April 2021. Malware triggered an outage for airline reservation systems that caused the networks of 20 low-cost airlines around the world to crash

April 2021. Russian hackers targeted Ukrainian government officials with spear phishing attempts as tensions between the two nations rose during early 2021.

April 2021. Hackers linked to Palestinian intelligence conducted a cyber espionage campaign compromising approximately 800 Palestinian reporters, activists, and dissidents both in Palestine and more broadly across the Middle East.

April 2021. Two state-backed hacking groups—one of which works on behalf of the Chinese government—exploited vulnerabilities in a VPN service to target organizations across the U.S. and Europe with a particular focus on U.S. defense contractors.

April 2021. MI5 warned that over 10,000 UK professional shave been targeted by hostile states over the past five years as part of spear phishing and social engineering campaigns on LinkedIn.

April 2021. Swedish officials disclosed that the Swedish Sports Confederation was hacked by Russian military intelligence in late 2017 and early 2018 in response to accusations of Russian government-sponsored doping of Russian athletes.

April 2021. New York City’s Metropolitan Transportation Authority (MTA) was hacked by Chinese-backed actors but were unable to gain access to user data or information systems.

April 2021. French security researchers found that the number of attacks hitting critical French businesses increased fourfold in 2020 during the COVID-19 pandemic.

April 2021. The European Commission announced that the EC and multiple other EU organizations were hit by a major cyberattack by unknown.

April 2021. Chinese hackers launched a months-long cyber espionage campaign during the second half of 2020 targeting government agencies in Vietnam with the intent of gathering political intelligence

March 2021. The North Korean hacking group responsible for a set of attacks on cybersecurity researchers in January 2021 launched a new campaign targeting infosec professionals using fake social media profiles and a fake website for a non-existent security service company target.

March 2021. Suspected Iranian hackers targeted medical researchers in Israel and the U.S. in an attempt to steal the credentials of geneticists, neurologists, and oncologists in the two countries

March 2021. Suspected Russian hackers stole thousands of emails after breaching the email server of the U.S. State Department

March 2021. Suspected state hackers targeted the Australian media company Nine Entertainment with a ransomware variant, disrupting live broadcasts and print production systems.

March 2021. Suspected Russian hackers attempted to gain access to the personal email accounts of German parliamentarians in the run-up to Germany’s national elections

March 2021. U.S. Cyber Command confirmed that it was assisting Columbia in responding to election interference and influence operations.

March 2021. The head of U.S. Cyber Command testified that the organization had conducted more than two dozen operations to confront foreign threats ahead of the 2020 U.S. elections, including eleven forward hunt operations in nine different countries.

March 2021. A group of Chinese hackers used Facebook to send malicious links to Uyghur activists, journalists, and dissidents located abroad.

March 2021. The Indian Computer Emergency Response Team found evidence of Chinese hackers conducting a cyber espionage campaign against the Indian transportation sector

March 2021. Polish security services announced that suspected Russian hackers briefly took over the websites of Poland’s National Atomic Energy Agency and Health Ministry to spread false alerts of a nonexistent radioactive threat.

March 2021. Both Russian and Chinese intelligence services targeted the European Medicines Agency in 2020 in unrelated campaigns, stealing documents relating to COVID-19 vaccines and medicines.

March 2021. Ukraine’s State Security Service announced it had prevented a large-scale attack by Russian FSB hackers attempting to gain access to classified government data.

March 2021. Lithuania’s State Security Department declared that Russian hackers had targeted top Lithuanian officials in 2020 and used the country’s IT infrastructure to carry out attacks against organizations involved in developing a COVID-19 vaccine.

March 2021. Suspected Iranian hackers targeted government agencies, academia, and the tourism industry in Azerbaijan, Bahrain, Israel, Saudi Arabia, and the UAE as part of a cyber espionage campaign.

March 2021. Chinese government hackers targeted Microsoft’s enterprise email software to steal data from over 30,000 organizations around the world, including government agencies, legislative bodies, law firms, defense contractors, infectious disease researchers, and policy think tanks.

March 2021. Suspected Chinese hackers targeted electricity grid operators in India in an apparent attempt to lay the groundwork for possible future attacks.

February 2021. A Portuguese-speaking cybercriminal group accessed computer systems at a division of Oxford University researching COVID-19 vaccines, and are suspected to be selling the data they collected to nation states.

February 2021. North Korean hackers targeted defense firms in more than a dozen countries in an espionage campaign starting in early 2020.

February 2021. Hackers associated with the Chinese military conducted a surveillance campaign against Tibetans both in China and abroad.

February 2021. Russian hackers compromised a Ukrainian government file-sharing system and attempted to disseminate malicious documents that would install malware on computers that downloaded the planted files.

February 2021. Hackers linked to the Vietnamese government conducted a nearly three-year cyber espionage campaign against human rights advocates in the country by using spyware to infiltrate individuals’ systems, spy on their activity, and exfiltrate data.

February 2021. Ukrainian officials reported that a multi-day distributed denial-of-service attack against the website of the Security Service of Ukraine was part of Russia’s hybrid warfare operations in the country.

February 2021. The US Department of Justice indicted three North Korean hackers for conspiring to steal and extort more than $1.3 billion in cash and cryptocurrencies.

February 2021. Iranian hackers took control of a server in Amsterdam and used it as a command and control center for attacks against political opponents in the Netherlands, Germany, Sweden, and India.

February 2021. North Korean hackers attempted to break into the computer systems of pharmaceutical company Pfizer to gain information about vaccines and treatments for the COVID-19.

February 2021. Suspected Iranian hackers targeted government agencies in the UAE as part of a cyber espionage campaign related to the normalizations of relations with Israel.

February 2021. The French national cybersecurity agency announced that a four-year campaign against French IT providers was the work of a Russian hacking group.

February 2021. Suspected Indian hackers targeted over 150 individuals in Pakistan, Kazakhstan, and India using mobile malware, including those with links to the Pakistan Atomic Energy Commission, the Pakistan Air Force, and election officials in Kashmir.

February 2021. Ten members of a cybercriminal gang were arrested after a campaign where they tricked telecom companies into assigning celebrities’ phone numbers to new devices, stealing more than $100 million worth of cryptocurrencies.

February 2021. Unknown hackers attempted to raise levels of sodium hydroxide in the water supply of Oldsmar, Florida by a factor of 100 by exploiting a remote access system.

February 2021. Two Iranian hacking groups conducted espionage campaigns against Iranian dissidents in sixteen countries in the Middle East, Europe, South Asia, and North America.

January 2021. Hackers linked to Hezbollah breached telecom companies, internet service providers, and hosting providers in the US, UK, Egypt, Israel, Lebanon, Jordan, Saudi Arabia, the UAE, and the Palestinian Authority for intelligence gathering and data theft.

January 2021. North Korean government hackers engaged in a sophisticated social engineering campaign against cybersecurity researchers that used multiple fake twitter accounts and a fake blog to drive targets to infected sites or induce them to open infected attachments in emails asking the target to collaborate on a research project.

January 2021. Suspected Indian hackers active since 2012 were attacked business and governments across South and East Asia, with a particular emphasis on military and government organizations in Pakistan, China, Nepal, and Afghanistan, and businesses involved in defense technology, scientific research, finance, energy, and mining.

January 2021. Unidentified hackers breached one of the data centers of New Zealand’s central bank.

January 2021. Hackers linked to the Chinese government were responsible for ransomware attacks against five major gaming and gambling countries, demanding over $100 million in ransom.

And these don’t even include standard businesses. Those attacks number in the tens of thousands! Here are a few:

  • Buffalo Public Schools
  • Acer Computers
  • CNA Financial
  • Applus Technologies
  • Quanta Computer
  • ExaGrid
  • Colonial Pipeline
  • JBS USA
  • US State Department
  • SolarWinds
  • Yahoo
  • LinkedIn
  • Facebook
  • Mariott
  • Adobe
  • Midwest Property Management
  • Wolfe and Associates Property Management

“Due to lack of federal oversight and regulation, property management companies’ cybersecurity programs may be relatively less developed and less sophisticated than in other industries. This could make them a more attractive target for cybercriminals looking for an easy way to steal personal data. We hear a lot in the news about data being exposed or stolen by cyberattacks in healthcare, banking and retail industries. But we tend to hear less about such attacks in the property management industry, even though they have happened before and will likely happen again. As a result, the risk of cyberattacks in the property management industry may be overlooked and underestimated.” Source: Ellen Clark, Rental Housing Journal

“The real estate industry accounts for a large number of financial transactions that involve sensitive information. This information tends to include bank account numbers and the buyer’s personal data based on the real estate system stored via the cloud. With a large amount of sensitive data on the cloud, hackers are finding real estate data is more accessible than ever before. “  Source: Zev Brodsky, Perimeter 81

If you have cloud or web-based software, just be careful to have data backups, redundant servers, and choose your property management software carefully. You still need to protect your local computers in addition to the online software.

If you have desktop-based software, be sure that your Internet routers have built-in security, and that you have virus and other protection on each of your computers. Make local backups on a regular basis and consider online backups as well.

Author, Wayne Gathright, W G Software, Inc.
Developers of Tenant File Property Management Software

Dealing with the Ongoing COVID Issues as a Rental Property Manager

Working Tenant File at ComputerWe thought that the coronavirus would be a blip in the rear-view mirror by now, but it is more like an annoying car that won’t pass you but rides your bumper. Every one of us had found ways to deal with it, but many of us have had to deal with sickness, heartache, and fear of the unknown.

As a property manager like us, we know that you have had to deal with business challenges, such as having to figure out a way to keep your employees connected, keep your business operating, keep you and your customers safe, and dealing with rent payments. Or maybe, dealing with ‘no’ rent payments.  The government hasn’t been kind to landlords during the pandemic, but tenants have been assisted quite a bit. The mandate to halt evictions has let some tenants receive stimulus checks but then decide to not pay rent, leaving the landlords wondering how they are going to make their mortgage payments.

At the Tenant File, we’ve dealt with similar issues, yet have managed to provide uninterrupted support for all of our customers. We’ve provided suggestions on how to use the Tenant File remotely, online tenant screening and rental applications, plus provided ways to receive your rent via online payments.

As a desktop product, the Tenant File gives you speed and the security that your data is safe and in your own hands. However, you can indeed use it over the Internet, if you make use of third-party applications such as Mikogo, GoToMyPc, RemotePC and others. Although it is not specifically supported, we also know of customers that are using Google Drive, Dropbox, and other shared folders to remotely share the Tenant File.

We are also developing a companion product that will be web based. We’ve had too many requests from customers for this option to ignore. However, we intend to keep the basic premise of the desktop alive and well. That is, to make sure it is easy to use, secure, and affordable. We are asking for input from current Tenant File customers to be sure we provide what you need in a rental property software product. Your loyalty is greatly appreciated and all of us at Tenant File want to be sure that we can meet your needs for years to come.

At the time of this writing, my in-laws all have the Delta COVID. I’m sure all of you have been touched by this disease in some way, too. But we’ve faced greater challenges as a country and I have faith in America. My prayers are for all of you. I wish you health and for your business to prosper and return to what we used to call ‘normal’.

Things to Consider in Drafting Rental Lease Agreement

Protect Your Assets When Creating a Lease

You have spent a lot of time and money to create your income producing asset. Now is the time to protect it with a solid lease agreement.

According to the National Multifamily Housing Council Survey, about 37% of homes in the US are rented. While this is near historic highs, which means that there are a lot of clients to go around, it is important for a landlord to exercise caution when entering into a lease agreement.

When you are buying a rental property, you intend for it to make your life easier, not more complicated. One of the best ways of protecting your interests is by having a proper lease agreement. A well-written lease agreement could save you a ton of money and tenant problems; hence it is critical to know the law and consult with a professional to determine your rights and responsibilities as a landlord and those of your tenants.

The following are some of the things to take into consideration when drafting a rental lease agreement:

Tenant Responsibilities

“I never knew I was not supposed to bring dangerous chemicals into the building.” Some tenants will claim total ignorance when caught with some dangerous explosive or chemical in the house. As such, it is important to clearly state the responsibilities of the tenant in the rental lease agreement. They need to know that they will have to keep the property free of any sanitary and safety hazards. They will need to follow all housing and building codes.

Security Deposit Terms

Tenants will break stuff, and you should be prepared for such an eventuality. The best way to be prepared is to have a security deposit that will usually include:

  1. Amount of security deposit
  2. Procedure for returning the deposit
  3. Name and address of the Institution or Bank where the Security Deposit is held
  4. Reasons for deducting from the security deposit

Contact Information

One of the best ways of preventing issues is by requiring the tenant to contact you in writing when there are critical things to be discussed. The litigious tenant will usually prefer instant messaging and texts, but these may not be printable and reliable way of keeping records. If you want to avoid any trouble, you need to require that all requests and communication be in writing, such as email or letters sent to a designated address.

Repair and Maintenance Policies

Most tenants will cause a ruckus over security deposits even when they have damaged the property. To prevent such battles, it is critical to explain maintenance and repair policies that may include:

  1. Whose responsibility it is to maintain sanitary and clean premises and to pay for any damage on the property outside normal wear and tear.
  2. The requirement that tenants have to alert you to dangerous and defective conditions and have specific procedures for handling repair and maintenance requests clearly spelled out.
  3. Restrictions on tenant modifications and repairs without written approval from the landlord.

Activity restrictions

“I have paid my rent and deserve to enjoy the property as I see fit.” We all know of the tenant who has music blaring late into the night, making it impossible for anyone to sleep. A good lease agreement needs to have a code of conduct for such situations. For instance, you may stipulate that there should be no loud music after certain hours.

Term of the Tenancy

Having a predetermined tenancy period which can be anything from a three-month rental or month-to-month agreement, protects you from problem tenants. Check with the local laws on tenancy and include stipulations such as how much notice the tenant or you needs to give before termination of the lease.

What’s Included with the Rental

Explicitly state if you will be providing utilities such as cable, electricity, heat and gas. In most instances, the tenant will be responsible for paying for the utilities, and you need to make that clear. If you will be providing furniture and appliances or any utilities, ensure that you list what is included in the rent and what is not.

Landlord’s Right to Enter Rental Property

It may be our property, but some tenants may throw a tantrum when you exercise your right to entry. They may have some claim to violation of privacy and illegal entry if terms are not clearly set out in the rental lease agreement. Check with local laws on access to the property and spell out what the tenant can expect in terms of landlord access to the property.

Landlord and Tenant Signatures

“I never signed that, and I don’t agree with it”, say some tenants. It is critical to remember that a lease agreement will only be enforceable if it has both the landlord and the tenant’s signature. These signify that both landlord and tenant have read and understood the terms of the agreement and agree to be bound by them. The agreement needs to be signed and dated by all tenants above the age of the majority that are named as parties to the lease agreement.

Consequences for Breach

There will be breaches of the rental contracts, and you need to be prepared. You can prepare by having a very specific list of consequences for violations of the contract. For instance, if a tenant persistently violates the lease agreement or cause damages to property and refuse to pay for the repairs, landlords will issue a warning or an eviction notice depending on the severity, and the repairs are getting deducted from their security deposit.

Are you leaving out an absolutely critical clause in your lease?

Woohoo! You just signed a new tenant lease! Ok, we’re tickled pink for ya – but hold on one minute, partner! (Sorry, we’re from Texas)

Tenant signed a new lease without Renter's Insurance

Did you require that the tenant have renter’s insurance?

No? Well … we’re taking back the ‘woohoo’ (sorry) … you made a critical error! Requiring renter’s insurance is not only a good idea for the tenant, but also something that affects you as a landlord.

Why, you say? Hmmm … how about greedy lawyers for a start? Having your tenants purchase (even cheap) renter’s insurance is an additional layer of legal protection for you, too.  Contrary to all of the great legal shows on HBO, spending your life in a courtroom is not all gripping drama and nighttime partying (although we highly recommend the latter).

Lawers fighting over Renter's Insurance

ASSumptions (you know the implication, don’t pretend you don’t):

Renter’s insurance only protects the tenant

Yep and nope. It does protect the tenant against when Barry Butthead is twerking on the dining room table, falls and breaks his arm. That’s the liability part. And usually it also protects against robbery, stupidity, and accidental breakage. We slipped in ‘stupidity’, because of things like putting a doggy toy in the toilet, causing a flooded apartment and forgetting to turn off the curling iron next to the toilet paper roll.

Of course, those types of things are YOUR fault, or at least some tenants will try to blame you. Then the greedy lawyers get involved, and well, you know the rest … you lose even if you win, if you know what I mean …

You don’t? Well, let’s say ‘Barry Butthead’ doesn’t have insurance, so they sue you (let’s say you are ‘Larry Landlord’). Next, the hospital feels left out, so they sue you too. Even IF your insurance company agrees to pay Barry’s medical bills (that’s a big IF), Larry Landlord will probably end up with higher insurance premiums.

Now, do you see how you can be affected? Doink! … that’s the sound of a light bulb hitting you on the head …

What about non-humans?

Alien coverage is typically not covered by any insurance policy (yet), but many times pets are. We are talking about domesticated pets, like dogs and cats, not monkeys, pigs, or cows. (Actually cows and pigs are pretty domesticated, but difficult to take out to do their ‘business’). We regress … if the tenant’s dog bites someone or maybe another dog, their renter’s insurance will most likely cover it. That’s a dispute you want to avoid, right? If you are accused of liability, it could take a ‘bite’ out of your profits. Sorry, we couldn’t resist!

Renter's Insurance covers dog bites
Here’s a really simple question, ok?

If a tenant can’t afford $20-$25 per month to protect their own belongings, do you think that possibly it is a red flag that maybe, just maybe, they might have a problem paying their rent? Just sayin’ …. do they need to march up and down in front of your office waving the red flag?

Let’s get hypothetical … a bad thing happens …

Who is responsible for housing your tenant while you do repairs? While it depends on your lease agreement, the state you live in, and the cause of the ‘bad thing’ –  YOU might be responsible. Or at least ‘feel’ responsible. Aawhh, you are so kind and caring, we love that! I wish you were ‘my’ landlord! But that’s another story, let’s stick with the topic.

Let ‘their’ insurance company do all that work – you’ve got a business to run! You can still send your tenant a ‘miss you’ card, while you deal with the contractors that are making your life a living hell.

The vanishing deductible

Not always, but if disaster strikes and your insurance company covers it, there is still the dreaded ‘deductible’ waiting in the shadows and ready to pounce on you. But wait! Maybe not! If the tenant was the cause, their renter’s insurance might cover YOUR deductible. This is not always the case, so don’t send me an angry email if they don’t – I get enough of that from my ex-wife.

Better than ‘My Pillow’

Not to trash a product (we love it, so don’t sue us), but maybe just knowing your assets and business is better protected may help you sleep better at night. Throw in a comfy pillow and you will sleep like a baby, hopefully without the bedwetting…

SUPER TIP #1: Here is how you can get your Tenant File tenants set up for renter’s insurance in seconds!

SUPER TIP #2: Look both ways before crossing the street

SUPER TIP #3: TIP #2 is better because it might save your life, but TIP #1 might save you some money and a headache!


About the author
Wayne Gathright is the president of W G Software Inc., which is the developer of the Tenant File Property Management Software (https://www.TenantFile.com). He enjoys healthy food (which leaves out most everything that tastes good), playing guitar (he’s awesome, if I must say so myself), and sucking up to landlords for profit.

Property Managers – The Next BIG Data Breach Target

Tenant File Cybersecurity Warning

As a property manager, you are busy – really busy. That is why you are not usually concerning yourself with hacking, data breaches, cyber security, and whatnot … your property management software handles that stuff for you, right? Think again. The property management industry is the next big data breach target for the hackers. It’s like the golden fleece of data and it is there for the taking.  Easy pickings …

Think like a hacker. There are SO many opportunities. For starters, all of your owners information is available. That includes bank account numbers, social security numbers, email addresses, passwords to access the software, and confidential accounting records. That is pure gold for someone wanting to immediately start draining bank accounts.

And that is just the beginning. When a potential tenant makes a rental application, they provide EVERYTHING a computer hacker needs to steal their identity.  Name, social security numbers, addresses, employment, cell phone numbers, references, wages, and much, much more.  That includes all of the tenants you have ever managed and even the ones that simply applied to rent from you.  It’s all in your property management software database.

How about the vendors that you do business with? You have all of their information as well. If you pay their bank account directly, you are responsible for their banking info, too.

What about your own data? That is all online as well, and you could have your identity stolen too. Once that is done, it could take years to get it back and to stop all of the instances of someone using your personal information throughout the dark web.

Angry Property Manager

A property management company is one-stop-shopping for a hacker. There is so much more data in one place, so it is a prime target for nefarious criminals. I understand that you are busy, and feel that you are protected. Why do you feel protected? Because a salesperson told you that you have nothing to worry about. Don’t believe it!

When you purchase a web-based property management software, you are probably overwhelmed by the security pitch designed to put your mind at ease. You’ll hear things like “we have redundant servers”, “we have never had a data breach”, “we have triple firewall protection”, “blah, blah, blah”.  Then you think, “wow, they could never have a data breach with all of that!”.

Think again. For starters, let’s review just ‘some’ of the recent data security breaches:

  • Panera Bread – estimated over 7 million
  • Sears, Kmart, Delta Air Lines, Best Buy – lumped together because it was a customer service company managing their clients – sound familiar?
  • Saks Fifth Avenue / Lord and Taylor – over 5 million debit and credit cards
  • Facebook – you’ve heard about this breach of over 87 million
  • Under Amour / My Fitness Pal – 150 million
  • Adidas – millions of customers compromised
  • Ticketmaster – millions compromised
  • Equifax – confidential customer information stolen
  • Yahoo – updated estimates of compromised accounts to 3 billion
  • Arby’s – undetermined number of stolen records
  • Dun & Bradstreet – they’re supposed to be the rock solid pillar
  • Chipotle – ongoing investigation to determine the numbers
  • California Association of Realtors – payments made online sent info elsewhere
  • Verizon – 14 million subscribers affected
  • Uber – 57 million riders and drivers data stolen from their GitHub repository.

Well, I could go on and on, but you get the point. If these huge companies with all of their sophisticated protection could be breached, do you ‘really’ think your online property management software company is better?  And those figures don’t even include major attacks on universities, government agencies, and our ‘grid’.

Our grid? Yes, the Russians and other countries may already be able to take down large portions of the United States power grid, if not all of it. Think of all the companies affected by Hurricane Florence on the East Coast. They may not have power for weeks. That means the property management companies cannot access their online tenant records, their owner’s accounting, banking, tenant screening, and more. They are basically ‘out of business’ until further notice.

I just want you to think about this. Even as busy are you are managing property, please take a moment to think about the precious data that you are entrusting to people you don’t even know. Of course you should change your passwords often and take other precautions, but is that really enough? Find out if you can download your important customer data to your own computer on a regular basis. Maybe you don’t even need an expensive web-based product when a desktop version will do just as well … just something to think about.

TIPS AND TRICKS – POSTING MANAGEMENT FEES

As a Property Manager, you’re main goal is to keep the properties that you manage occupied by reliable tenants, handle the maintenance on the Units, contact your tenants concerning their rent payments and at times deal with evictions.  That is, of course, why we have Management Fees which can be set up as a percentage of the rent received, flat fee on each rental income or a fee on all Units whether the rental income is received or not per month.  The Tenant File is designed to handle any type of Management Fees that your contract sets forth. Here are some tips on posting management fees.

It is best to determine which method is best for your needs and continue with the same method so that the fees are not charged multiple times in the same month.  The most efficient way (through the ‘Post Rent’ button) is to post the fees automatically each time you post rent income.  In this method, each time you receive and post ‘Rent Received’, whether it is a full rent or partial rent, there will be a ‘Management Fee Charge’ right after the ‘Rent Received’ posting in your Unit Ledger. The other way is to have the program calculate and charge the ‘Management Fees’ to all Units that received a rental income throughout the month, prior to paying your Owners.

To charge Management Fees as you post ‘Rent Received’:

This is done by using the ‘Post Rent’ button from the Main Menu. In Step 2 of the section called “I want to post rent income FROM my Tenants”, you would indicate ‘Yes, calculate Management Fees automatically’ on each rent that is posted. You can even issue a check to yourself for all ‘Management Fees Charged’.  You need to make sure that you have selected the correct ‘Bank Account’ for your ‘Management Fees’ check.

How to post Management Fees through Automatic Posting at the end of the month:

You can still use the ‘Post Rent’ button as in the method above, but make sure you select ‘No, do not post any Management Fees’ in the ‘Post Management Fees for all Rents posted?’ selection under Step 2. This procedure will allow you to post the ‘Rent Received’ transaction without charging the fees.  That would be done at the end of the month.

If you choose to post ‘Rent Received’ directly to the ledger (without creating a Deposit) or by posting your rents as a bank deposit, you can still post your ‘Management Fees’ automatically at the end of the month (or any time) by using ‘Automatic Posting’.

Note: This procedure would be done after you have received and posted all of your rents for the month but before you have paid your Owners.  Please Note:  The ‘Automatic Posting’ function will create checks ONLY to the Main Operating Account.

Action: From the Tenant File Main Menu select ‘Posting’, then ‘Automatic Posting’.

Choice: If you wish to create a check to the Management Company for the total of all management fees posted, select the ‘Issue Checks for posting’ box. The program will create separate checks for each management fee posted unless you also select the ‘Consolidate Checks created’ box. If you do create a check, the management fees will not be posted until the check is printed, otherwise the transactions will be posted immediately.

Action: Under ‘Posting Options’, click on ‘Post MANAGEMENT Fee’.

Choice: Under ’Scroll by’, if you are going to scroll through each Unit one by one and decide which ones to post, and you wish change the order in which you will be alphabetically scrolling through the list of Unit Addresses, then select a different ’Scroll by’ option.

Choice: Under ‘Posting Range’, you can limit the posting to a range of names. This should not be used normally for posting management fees. If you do use this feature, the name used will be dependent on your selection in the ’Scroll by’ options. For example, if you are scrolling by ‘Unit Address’, then you could enter a range from ‘1200 Smith Road’ to ‘1590 Smith Road’. Or if you are scrolling by ‘Owner Name’ and wish to charge management fees to one Owner only, you could enter a range from ‘Johnson’ to ‘Johnson’.

Action: Click on the ‘Begin Posting’ button.

Note: You will see a screen for your choices regarding posting Management Fees. You can post the fees based on rent collected between any two dates, or you can post the management fees based on the full rent for each tenants, regardless of whether rent has been collected or not. Choose ‘Choice One’ or ‘Choice Two’ and begin posting. This will take you to the posting screen.

Tenant File Management Fees

Action: To post to all of the Units without pausing, click the ‘Post All’ button. To post only the one item shown and move to the next one, click the ‘Post this’ button. To skip only the item shown and move to the next one, click the ’Skip’ button. You can make changes to the date or management fee amount if you are pausing at each Unit.

If you choose not to create a check for the management fees posted at this time, you can create a check later through the ‘Add/Edit’ Checks selection under ‘Checks/Deposits’. You will need to be sure to select ‘None’ under the ‘Post To’ selection when creating a check. To get a listing of all ‘Management Fees Charged’ that were posted to the ledgers for any date range, run the ‘Account Listing’ report, by entering the ‘Include Dates’ for the date range, the Include Range (i.e. ‘Management Fee Charged’), and clicking ‘Print Report’.  Note:  If you do not have the program create the check when posting the fees and choose to create a check posted to ‘None’ at the end of the month as indicated above, there will be no ‘split detail’ attached to the check for the separate ‘Management Fees Charged’ transactions.


Tips and Tricks – How to Post Rental Income

As a property owner and/or Property Manager, one of the more important ‘daily routines’ would be posting your rental income from your Tenants.  In the Tenant File program, there are several ways to complete that important task – the easiest method, of course, would be to sign up with one of our affiliate companies, REVO Payments and use the Tenant File DirectPay option, which will allow your tenants to pay you online on your own website.

If you choose not to sign up with an online company, the second best way would be to utilize the POST RENT screen found from the Main Menu of the program.  The following will describe the step-by-step methods for the different procedures to get the task done….

REVOPAY – With the Tenant File DirectPAY option, you will be able to set up an online payment system with your tenants, affording your tenants 24 hour convenience of paying their rent online and helping you to get your rental income in a timely fashion.  Your tenants will be able to pay their monthly rental payment online by eCheck, Credit Card or even recurring payments.  The payments will then automatically post in the correct Tenant File ledgers along with your Bank Register.  You can even set it up to have your tenants pay the ‘per transaction fee’.   Detailed information on the pricing and set up of RevoPay can be found on our website at https://www.tenantfile.com/directpay-ach-payments.html where you can view a short video of the process along with information on their monthly subscription fees.

POST RENT OPTION – Without the DirectPay option, the fastest and most flexible way to post your rental income would be to click onto the POST RENT button from the MAIN MENU.  This process will allow you to post the ‘Rent Received’ income from all or selected tenants, post ‘Late Fees Received’, charge the ‘Management Fee’ for each rent payment received, post a second income posting (such as ‘Laundry Fees’, ‘Trash Pickup Fees’, etc.), create a Bank Deposit, and create a Management Fee check all on one screen.
Tenant File Tips and Tricks - How to post Rental IncomeStep 1:
Are you Posting Rent to . . . –
If you choose ‘Selected Tenants’, no rent amount or management fees will be entered for you (on the following screen), so that you can enter the rent received for each one yourself. The correct ‘Management Fees to Post’ will be calculated based on the rent you post (and the ‘Management Fee’ field entered in the separate Owner Ledger screens).  The method of ‘Selected Tenants’ is the more common method since it gives the user the ability to enter the correct amount received for each tenant and balance to the total of checks in hand.

If you receive a majority of your rental income on the same day, you can choose to post to ‘All Tenants’ and the program enter the full rent amount for all Tenants in the program to be posted along with all ‘Management Fees to Post’ (as per the settings in the Management Fee’ field you previous setup in your Owner Ledgers).  If a few tenants did not yet pay, you can zero out the amounts in the row and edit both the rent amounts and the management fees for any tenants that paid a partial rent.  If you select this choice, make sure that the total of the rents to post balance to the rent checks that you have received.  Remember, if you enter to post to ‘All Tenants’, the program will show that every tenant paid you the full rent ‘Payment’ as entered in the ledger.

Step 2:
Post Management Fees for all Rents Posted? –
You can have the program automatically calculate and enter management fees for each rent amount posted.  There are different ways to post your Management Fees in the program.  If you choose not to post the fees as you receive rent, you can post the ‘Management Fee Charged’ transactions at the end of the month utilizing the ‘Automatic Posting’ section of the program.

Step 3:
Check / Deposit Options –
If you are utilizing the Check/Deposit feature in the program to keep track of your Bank Account(s), you can have the program create a bank Deposit for all rents posted along with a check (to you) for all management fees posted.  We HIGHLY suggest that you enter a deposit number, which will tie the deposit ledger transactions to the deposit in your Register. You might want to use the current date with no slashes, such as 180405 if the date is 04/05/2018.  If you choose to have the program create a check for all ‘Management Fees to Post’, the transactions will appear in the Unit Ledgers once you print the check.

Step 4:
Date to Use –
This is the transaction date that will appear on each ledger line.  The settings will always default to the current date, but you can edit the field to post to a past or future date.

Sort By – You can choose the following screen to be sorted by ‘Owner Name’, ‘Property Name’, ‘Rental Address’ or ‘Tenant Name’, whichever is easiest for you to post to the correct Tenants.

Account Defaults – This information is pulled from your ‘Account Defaults’ which is a section that you will need to set up at the onset of installing the program.  Be sure to check that the correct accounts are set as the default for your rent income, Management Fee expense and Late Fee income and change these if they are not correct.

Posting Filters – This section allows you to ‘Include only those Tenants that have a balance due’ or ‘Include only Tenants from this Owner’.  This will allow you to limit the listing for easier posting.

Bank Account to Use – This section allows you to choose one of the ten Bank Accounts available to post the Deposit to and/or create a Check for the ‘Management Fees to post’. If will always default to the first Bank Account (which is the Main Operating Account for most users).

Note:  If you have separate Bank Accounts for each Owner, select one of the Owner Names from the drop-down under ‘Posting Filter’ and then select the correct Bank Account for that Owner.  If you choose to create a Deposit, all postings that you enter on the ‘Tenant File Rent Income Posting’ screen will be deposited into the Bank Account you choose in this section.

This is the posting screen that details the amounts to be posted and allows you to edit the amounts first.
Tenant File Tips and Tricks - Rental Fee Income Posting
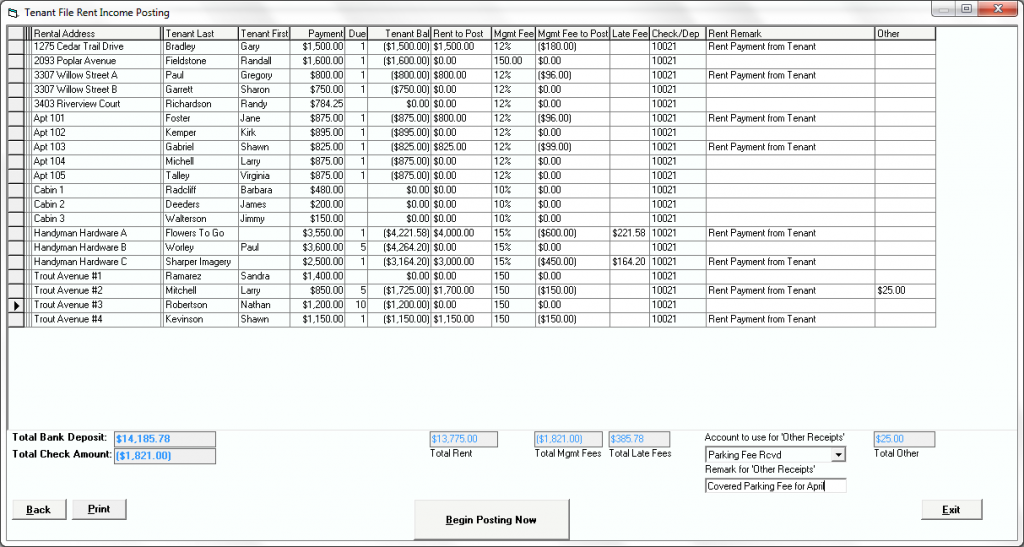
Enter the correct rental income amount received for each Tenant in the ‘Rent To Post’ column if you previously entered ‘Selected Tenants’ in Step 1.  If you entered ‘All Tenants’ under Step 1, the monthly payment amount for each tenant will be completed for you in this column.  Only the ‘white’ columns, such as the ‘Rent to Post’, ‘Mgmt Fee to Post’, ‘Late Fee’ Received, ‘Remark’ and the ‘Other’ column can be edited. Once you have entered the amounts from your rent checks and clicked down to the next line, the ‘Total Rent’ field will calculate and will be the total of all of your postings.  This will be the amount of the deposit created, if you choose to create a deposit.  It is very important that you make sure that this total balances to your checks in hand.
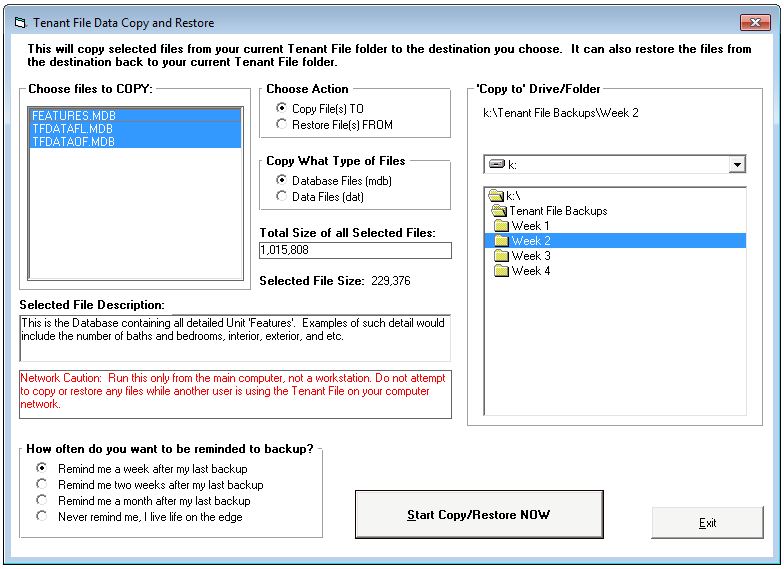
After you make any changes to a row, be sure to save the row by clicking on any other row above or below the current row.  There is no ‘SAVE’ button on this screen.  Once you make sure that the ‘Total Bank Deposit’ matches the total amount of the checks on hand, select ‘Begin Posting Now’ and all entries will be posted to the separate Tenant Ledgers from the entries on this screen.  If you chose to create a deposit and a check, the deposit amount will be posted to the Register and a check will be available for printing for your ‘Management Fees’ posted.

POSTING RENTAL INCOME THROUGH THE DEPOSIT SECTION

Another method to post rental income would be to create a deposit for your rental checks.  Simply click into the ‘CHECKS/DEPOSIT’ button from the MAIN MENU and change the DISPLAY (on the upper right corner) to DEPOSITS.

Select the correct ‘Bank Account’ from the drop-down Menu on the top of the screen prior to entering a new deposit and click NEW.  Enter a ‘Deposit Number’, the date for the postings and a ‘Remark’.  Since this would be a deposit for your rental income, you would select TENANTS under the ‘Post To Ledger’ option.

Select ‘Rent Received’ from the drop-down list in the ACCOUNT column and enter a TRANSACTION REMARK.

Select the correct Tenant’s name from the drop-down list under the POST TO DESCRIPTION and enter the amount of the rental income received.  Once the information is completed on each row, click down to the next row to save the information and update the ‘Deposit Amount’ field.

If you received a Late Fee or other income, you would enter the information in the next row.  Continue with each rental income check received.  After all entries for the deposit are entered, click the SAVE button. Once saved, you can choose to post the deposit transactions to the appropriate ledgers immediately or keep the deposit open to add new transactions at a later time.

It is very important to remember that transactions will not post to your ledgers until you click to POST the deposit. Therefore, if you choose to SAVE the deposit and need to EDIT the information prior to posting, you MUST remember to go back to the deposit, edit any entries and/or add new entries and click SAVE and POST when complete.

As you can see, if you are utilizing the CHECKS/DEPOSIT feature of the program, it is much easier to post through the POST RENT section, however, you may need to use this method for new tenants that you are just now inputting into the program.

POSTING DIRECTLY TO A LEDGER

If you choose not to utilize the Check/Deposit feature of the program, you can post rental income directly in to a Tenant’s Ledger by locating the correct Tenant (click on the TENANTS button from the MAIN MENU and then select FIND).  Once you are in the correct Tenant Ledger, click on to the ‘LEDGER’ button to view your transaction grid.  Post the transaction in the first ‘blank’ line (the line with the asterisks).  Click down to the next line to save your transaction.  At this point, if you choose, you can print a ‘Payment Receipt’ by clicking on to the ‘PRINT’ button in the ledger.

So, as you can see, there are several ways to post rental income, so you will need to decided which one works best for you.  In any case, the Tenant File Property Management Software has everything you need to keep track of rental income and expenses, so that you can spend your time making your business profitable.

Tenant File Tips and Tricks – Keeping Track of your Bank Account

The Tenant File Property Management Software allows users the ability to keep track of up to ten Bank Accounts within each installation. Whether you are posting expenses or posting rental income, the process can be completed directly by creating checks and deposits.

Of course, you have the flexibility of posting transactions directly to your ledgers; however, by utilizing the Checks/Deposit function of the program, you can complete all postings while keeping a separate bank Register on each account. In addition to creating checks and deposits, you have the ability to ‘Reconcile’ your accounts each month against Bank Statements.

How to create a check…

New Tenant File Check

To create a new check, click into the ‘Checks/Deposit’ button from the Main Menu. Any checks that you have previously entered but not yet printed will display on your screen.

The Command Buttons on the side of the check will allow you to add a ‘New’ check, ‘Edit’ an existing ‘Entered’ check, ‘Delete’ a check, enter a ’Split’ transaction detail on a new check, or ‘Void’ a check.

Select Bank Account – At the top of the check screen, you will need to select one of the ten Bank Accounts for the check you are entering. Upon entering a new check or deposit, the default bank account will always be your ‘Primary’ Bank Account. If you maintain separate accounts for your Owner, it is very important that you choose the correct account at the onset.

To enter a New Check, press the ‘New’ button and enter the following information:

Pay to the Order Of – Make your selection directly from the ‘Payee List’ on the right side of the screen (Vendor List, Owner List or Tenant List). By selecting the name from the list (and not typing in the name) it will allow for consistency when looking for a payee name or when creating your 1099 MISC forms at the end of the year.

If the same name is spelled two different ways, the program will consider that as two different Vendors, for example. In addition, selecting from the list will automatically include the address for the check. If the check that you are creating is for a new Vendor that you have not yet setup, you can click into ‘Vendors’ under the ‘Payee List Box’ and click ‘Add Vendor’.

Date – Your current date is displayed, however, you can change this date by clicking onto the ‘Date’ field and enter the date that you want printed on the check.

Amount – The amount of your check will be automatically calculated from the total of the ‘splits’ that you will enter in the transaction grid at the bottom of the check. Note: You do have the option to create a check that is not to be posted to any ledger. In this case, you would select the ‘Post to Ledger’ Status as ‘None’ and then would be required to enter an amount in the field.

Invoice – User entered Invoice number.

Remark – User entered remark. This remark is for the entire check. Each split for this check has a remark that will be posted to the transaction ledger.

Post To Ledger – When posting transactions into the Tenant File, you must indicate the type of ledger that the transactions are to be posted. Any transaction that applies to a specific rental unit (such as fixing the sink in unit A of a duplex) needs to be posted to the Unit Ledger (including single family homes). Any transaction that applies to the entire ‘property’ (such as Lawn Care or maintaining the pool at an apartment building) should be posted to the ‘Property Ledger’. Lastly, any transaction between you (the Manager) and the owner of the property should be posted to the Owner Ledger.

Postings to be charged to the Tenant will go to either the Tenant Ledger (if it only affects the Tenant, such as ‘Repairs & Maintenance’ that the Tenant is responsible for) or to ‘Both (Tenant and Unit Ledgers)’ if it affects ‘Both’ the Tenant AND the Owner. Whichever type of Ledger that you select in the ‘Post to Ledger’ selection will determine which expense accounts will be accessible in the drop-down under the ‘Accounts’ column.

Lastly, if you need to create a check that is not to be posted in any Ledger within the Tenant File program, there is a selection called post to ‘None’. If you are going to utilize the Check/Deposit section of the program and intend to Reconcile your Bank Account(s) with the program, you should always create a check for the posting rather than posting directly into the Ledger.

Entering the Split Transactions for the Check:  On the bottom half of the screen, you will enter the transactions for each check. Every check will have at least one row, unless you have selected the ‘Post To’ status of ‘None’ and will not post the check to any ledger.

Complete each column of the row and move to the next line to add more splits for this check. After making a change or adding a row, you must click on another row (above or below) to save the current row.

You are able to post transactions to different types of ledger (such as a Property Ledger and a Unit Ledger) within the same check by changing the ‘Post to Ledger’ Status. Simply save the current row and then click on the ‘Post To Ledger’ option box to change the Ledger type. You can create multiple postings to multiple ledgers from a single check. Once you have completed the check, click on the ‘Save’ button prior to exiting.

How to print a check….

Print Checks in Tenant File

The transactions associated with Entered checks are not posted to the ledgers until you actually print the checks. To print one or more of your Entered checks, click into the CHECKS/DEPOSITS button and click on the selection at the bottom of the screen called ‘Print Checks.

Once you select the correct ‘Bank Account’ from the drop-down list, you will see your list of entries in the ‘Entered Check’ file for that particular Bank Account. To select or de-select all checks, click the correct button at the bottom of the screen. If you just want to print individual checks from the list, hold down the ‘Control’ key (Ctrl) and click on the rows you want to include.

Starting Check Number to use: The Tenant File will remember the last check number printed, but be sure to look at your check stock and edit the field accordingly.

Starting Date to use:  Leave this field blank to use the date that was entered on the check. You can choose to change the date of the printing if you need to.

Print Check Number on Check: If checked, this will print the check number in the upper right area of the check. All pre-printed checks have the number included on the check stock, therefore, if you wish, you can remove the check mark to prevent the number form printing.

Skip Print – Post Only: This selection will do everything normally done when printing a check, except that the checks will not be sent to your printer. Users that want to keep track of their Bank Account(s) but do not print checks will use this function to post the transactions and show the printed checks in their ‘Bank Register’.

Start Printing: Click this button when you are ready to print your entered checks. Once the checks are printed, you will want to view them to make sure that they printed correctly. The program allows you to ‘Reprint’ the checks if your printer didn’t print the checks correctly or you want to modify the check(s) prior to posting to the ledger. In the pop-up, if you answer that you want to reprint your checks, all of the checks will remain as ‘Entered Checks’ and transactions will not post to your ledgers. In that case, you would make the necessary changes and reselect and reprint the checks. If you answer ‘No’ (that you do not need to reprint), all selected checks will be transferred to the ‘Printed’ check file and the transactions will be posted to the appropriate ledgers. Once moved to the ‘Printed’ check file, you cannot edit or re-print the checks.

How to create a Deposit …

To create a new deposit, click into the ‘Checks/Deposit’ button from the Main Menu and change the DISPLAY (on the upper right corner) to DEPOSITS. Select the correct ‘Bank Account’ from the drop-down Menu on the top of the screen prior to entering a new deposit.

To enter a new Deposit, click NEW. You would then want to enter a ‘Deposit Number’ for the new deposit. We highly suggest that a number be created since the Deposit number ties the potentially multiple ‘split transactions’ when searching for a deposit and in multiple reports.

Enter the date and a ‘Remark’. Just like checks, you can post transactions from a deposit to different types of ledgers, such as a mixture of postings for an Owner, Property, Unit, or Tenant all in one deposit. To do this, just click on the correct ledger under the ‘Post To Ledger’ option, and then enter the information in the transaction row. Once the information is completed on each row, click down to the next row to save the information and update the ‘Deposit Amount’ field.

After entering all entries for the deposit, click the SAVE button. Once saved, you can choose to post the deposit transactions to the appropriate ledgers immediately or keep the deposit open to add new transactions at a later time.

It is very important to remember that transactions will not post to your ledgers unless you click to POST the deposit. Therefore, if you choose to SAVE the deposit and need to EDIT the information prior to posting, you MUST remember to go back to the deposit and click POST when complete. The field in yellow next to ‘Posted to Ledger’ will either indicate an ‘N’ stating that it has not been posted or a ‘Y’ once it has been posted. Once you click to POST the deposit, all related transactions are posted to the ledger(s) and you can no longer edit the information.

At the end of each month, if you choose, you can RECONCILE your Bank Account(s) to your Bank Statement.

How to Reconcile…

Reconcile Tenant File

Step 1: Display the Bank Register by clicking on the REGISTER button from the Main Menu.

Step 2: Select the correct ‘Bank Account’ from the drop-down list that you wish to reconcile. Your main Property Management Account is the default account that will always show when you click into the Register. Click the drop-down and select a different account if you are not balancing your main account.

Step 3: Click ‘Add Register Charges and Credits’ to enter in any bank fees (i.e. monthly service fees) as a DEBIT and bank income (i.e. Interest Earned) as a CREDIT.

Step 4: Click the ‘Reconcile’ button. The Beginning Balance field will be the total of all previously reconciled checks and deposits.

Step 5: Find the Ending Balance on your Bank Statement and enter it in the ‘Ending Bank Balance’ field.

Note: You will see a display of all checks and deposits that are currently PENDING, including any bank charges and credits that you have just entered. Only checks that are marked PENDING and not CLEARED will display.

If you manually changed the ‘Status’ in the Bank Register of any checks or deposits to ‘Cleared’, you would not be able to complete a reconciliation until you change any checks marked ‘Cleared’ in error.

Step 6: Compare the list in the Reconciliation section to the checks and deposits that have cleared your bank. Find all checks and deposits that match the transactions on the statement and click the transaction to mark it as ‘Cleared’ on this screen.

Note: Make sure that the transaction that you clear matches exactly (dollar and cents) to the amount listed on the statement. If you determine that some amounts do not match exactly, you will need to leave the Reconciliation section and correct the transactions.

Once corrected, click into RECONCILE and follow the above instructions. Likewise, if you find a transaction on your Bank Statement that is not shown in the listing in the Reconcile, you will need to leave the Reconciliation section and find the transaction that was not entered into the Tenant File. Once you have entered the transaction, click into REGISTER and RECONCILE and follow the above instructions.

Note: Once you have cleared all checks and deposits and have verified that they match all checks and deposits that have cleared as per your Bank Statement; the total will be calculated and entered into the CLEARED field of your Reconciliation window.

Note: The difference between the Ending Balance plus all Cleared checks and deposits and the Ending Bank Balance will display in the window called DIFFERENCE.

Step 7: If the amount is $0.00, you have successfully reconciled the Tenant File checking account with your Bank Statement. To print a Reconciliation Report, exit this section, go to REPORTS > CHECKS/DEPOSITS report type > Check Reconciliation (Cleared).

Note: If the amount is not zero, your Tenant File Account is not in balance with your Bank Statement. You will need to determine if there are any checks or deposits that have not been entered into the Tenant File but show up as a Cleared transaction in your Bank Statement.

Or you may have a check or deposit that was cleared in error in the Tenant File register but does not show up in your Bank Statement. You would need to exit the Reconciliation Section and correct any mistakes.

How to order Checks and Deposits…

The Tenant File supports a number of common check formats, but in order to be guaranteed compatible, checks can be ordered from our website at www.TenantFile.com > PRODUCTS > CHECKS AND SUPPLIES where you can view our pricing and download an Order form.

Checks are available in a number of colors and styles. Our turnaround time is fast and the prices beat other major check printing companies.

In addition to checks, we offer great pricing on Deposit Booklets, printable Deposits, Endorsement Stamps and Address Stamps. The styles available that are compatible with the Tenant File include ‘Check on top – with two vouchers per page’, ‘Check in the middle – with a voucher above and below the check’ and ‘3-on-a-page checks with no voucher.

As a service to our customers, we have been able to keep our pricing low throughout the years that we have offered check printing to our customers.

DirectPAY Option …

An option to consider in finding the best way to save time and money and to prevent the necessity of creating deposits for rental income and creating and printing checks to your Vendors and Owners, is to sign up with DirectPay. As a busy Property Manager, wouldn’t it be great to click into your software program and see that your Tenants have paid you online and all transactions were posted?

The Tenant File Property Management Software has an affiliation with REVO Payments which allows Tenant File users to add online rent payment and bill processing to your property management process. You can break through the standard eight-hour leasing office day and keep payments coming into your office at any time.

With the Tenant File Property Management Software, you’ll be able to use DirectPAY to set up an online payment system with your tenants, affording your tenants 24 hour convenience, and helping you to get your rents in a timely fashion.

With DirectPAY, you will be able to receive rent payments online 24 hrs a day/7 days a week which will automatically post to the Tenant’s Ledgers. The process will save you the time that it takes to process checks received, create bank deposits and post to the program. It is all completed by the automated process. Once you sign up with DirectPay, they will create a custom, branded payment page that’s optimized for any device – PC, tablet or smartphone – to accept eCheck, credit and debit card payments.

Your tenants will appreciate the ability to take care of their obligations of paying rent by eCheck, Credit Cards, or recurring payments directly to your website for a small transaction fee processed directly to your Tenants.

Tips and Tricks – View Information from Previous Backups

Tenant File Previous Backups

As indicated in our previous blog, we highly suggest that you make backups of your database from time to time.  At any time that you click into BACKUPS (from the MAIN MENU) and make a backup of your current data within the Tenant File program, you are required to tell the system where that file named ‘TFDATAFL.MDB’ is to be stored.  This database is your MAIN database file that holds all of your ‘Active’ Owner, Property, Unit and Tenant Ledgers along with all transactions, checks, deposits, etc.  The file created through the Backup Procedure is a database file only meaning it does not include the entire program and you cannot open that one file to view your previous data.

You should never restore a previous database over your current Tenant File data.  If you were to click into BACKUPS > RESTORE > and choose to restore a backup from a previous date, you would be overwriting your current database.  That means that all transactions, checks, deposits, entries, etc. that were entered into your current program would be lost and your data will revert back to the date and time of that previous backup.

The way to view data from previous days, months or years would be to access one of the Tenant File Folder Backups that you would have created prior to running the Year End Closing.   Our Year End Closing Instructions (as found on our website under SUPPORT) gives detailed step by step instructions on how to create a ‘full program backup’.

If you have not run the ‘Year End Closing’ and/or do not have a second installation of the program required to view previous data and if you need to access the information from previous backups, you should choose to create a copy of your entire Tenant File program folder on your computer’s hard drive.  That way, you can access last year’s files or previous database files without having to restore files over your current data.  Be very careful to follow the instructions below. Depending on the version of Windows that you are using, the procedure may be slightly different for your computer.

Note: This assumes your files are in a folder named ‘TF4WIN’.  If not, substitute the name you assigned instead. To see where your Tenant Files are located, go to the icon or program shortcut that starts the program, then right-click on that item. Go to ‘Properties’, and look for the ‘Start in‘ path of your Tenant File program. The file TF4WIN.EXE is NOT part of the path or location! (Note: The steps below assume your Tenant File is in the folder ‘C:\Tenant File\TF4WIN’ which is the default folder upon purchase – if you changed that default location upon installation, yours may be different.)

Step 1:  Open Windows Explorer (or find ‘Computer’, ‘My Computer’ or ‘This PC’).

Step 2:  Double-click on your local computer hard drive letter. (Such as drive ‘C:’)

Step 3:  Find the folder named ‘Tenant File’ and double-click to open it

Step 4:  Find the folder named ‘TF4WIN’ and click once on the folder to highlight the folder.  (Don’t open it)

Step 5:  Press Ctrl-C (or Control-C) to copy the folder. (You won’t see any change)

Step 6:  Press Ctrl-V (or Control-V) to paste the folder. (You may not see any change)

Step 7:  Find the NEW FOLDER, named ‘TF4WIN – Copy’ (or ‘Copy of TF4WIN’). (Probably at the bottom of your current window)

Step 8:  Right-Click on the new folder, then select ‘Rename’.

Step 9:  Edit the name of the folder to a name of your choice.  If this is a folder that will hold last year’s data (for example), you might want to change the name to ‘TF4WIN2017’ or whatever you want to name it as long as you know that it is not your current data.

At this point, you can choose to create a shortcut to this new folder.  Please note: You would want to make sure that this ‘Backup of the full Tenant File program’ is not accessed for current entries.   It is a full program and will allow new transactions, checks, deposits, etc. but previous data SHOULD NEVER BE EDITED.

NOTE: To create a shortcut for the ‘Backup Folder’: Double-click to open the folder you just created. Find the program file TF4WIN.EXE, and RIGHT-CLICK on the file. Select ‘Create Shortcut’, which should create a ‘shortcut to TF4WIN.EXE’ file in the same folder you are in. Drag that shortcut to your desktop. You should rename the shortcut something that is more descriptive, such as ‘Tenant File 2017’ or ‘Tenant File – Previous Data’.  To do so, right-click on the new shortcut that was created on your desktop and choose ‘Rename’.

Note:  If you are running our current Tenant File 8 Version (and you should be) and you attempt to restore a database from a previous version, you will be required to enter your ‘User Name’ and ‘Password’.  That information is saved in your current database and therefore will be required if you attempt to restore an older database.

If this is a little more that you feel comfortable doing, you can always have one of our experts do it for you. They can connect to your computer remotely, create the desired folders and help locate any backup that you want to look at. Or order, just go to the Tenant File website (www.TenantFile.com) and click on ‘Order Now’ at the top.

As always, be sure to make backups of your current data before you do anything regarding file copying and restoration of data.


Tips and Tricks – Security Deposits in the Tenant File

 Many states require that the Tenant’s Security Deposits be held by the Property Manager and accounted for separately, requiring a separate bank account to hold those deposits.  Whether you hold the funds in ‘Trust’ or pass the funds to your Owners, the Tenant File will allow the different methods of posting Security Deposits.

The Tenant File allows for up to 10 bank accounts. One main Property Management Account, called the Primary Account, and up to 9 other bank accounts that the User sets up. If your state requires that you hold the Security Deposit in a separate account (and not transfer the funds to the Owner), then you would utilize one of the additional accounts (other than the Primary Account) for those funds.

When a new Tenant is entered into the system, you will need to process a ‘Charge’ to the Tenant Ledger with the amount of the Security Deposit required (i.e. ‘Security Dep Charged’), similar to charging a Tenant Ledger with their Rent.  If the Tenant has an additional Deposit required, such as a ‘Pet Deposit’, you would also process that charge. (i.e. ‘Pet Dep Charged’).  When the Security Deposit is paid, you ‘Credit’ the Tenant Ledger (using ‘Deposit Received’), which will zero out the deposit charged.  The amount of the ‘Security Deposit Received’ would need to be entered under the Tenant information field titled ‘Deposit 1’. You would do the same with the ‘Pet Dep Received’ and enter the amount under ‘Deposit 2’.  This process of posting the ‘Security Dep Charged’ and the ‘Security Dep Received’ is a ‘wash’, yet it allows for a history of what the Tenant has paid and what you, as the Property Manager, are holding in escrow for that Tenant (or has passed on to the Owner).

The Tenant File Accounts are set to post the ‘Security Dep Received’ to the Tenant ONLY due to the fact that a majority of the states are required to hold those funds.  IF you do not hold those funds and pass the Deposits on to the Owner, then you would need to modify your account settings under PREFERENCES > ADD/EDIT ACCOUNTS and change the ‘POST TO’ Ledger Status of the ‘Security Dep Received’ to post to BOTH (T/U).  The deposit income would then be posted to both Tenant and Unit and the amount(s) would be included in the ‘Paid to Owner’ check.

When the Tenant vacates the Unit, if you are holding the funds in ‘Trust’, you would need to refund to the Tenant the portion of the Deposit(s) that remain once all repairs and expenses have been processed against them.

A new procedure was added to our current Tenant File Version 8 which allows for a compact, easier and quicker way to post Security Deposit Refunds and/or Dispositions. To use this feature, click on the MISCELLANEOUS selection from the Main Menu and choose ‘Security Deposit Disposition’. You will see the following screen:

Security Deposit Posting in the Tenant File

This new feature will allow you first transfer the funds from the ‘Security Deposit’ Bank Account to your ‘Operating’ Bank Account (if need be), transfer the funds back to the Tenant Ledger, subtract any expenses incurred from the Deposit, refund the available portion back to the Tenant and Forfeit any funds to the Owner.  And, of course, all deposits and checks will be automatically created for you.

Simply click onto the dropdown list to select the desired Tenant and the currently entered Security Deposit amount will be filled in for you. This information is pulled from your Tenant Ledgers in the ‘Deposit 1’ and the ‘Deposit 2’ fields, therefore if the information does not show to be correct, exit and view the Tenant Ledger.  It is very important that you make sure that all of the information and accounts shown on your screen are correct prior to proceeding.

Your first step would be to indicate if you keep the ‘Security Deposit’ funds in a separate Bank Account (i.e. Trust Account), but write all of the checks from an ‘Operating Account’. If so, the program will transfer those funds from one account to another if you click in the upper right corner the option button labeled ‘I first transfer from escrow to another account’ under the section titled ‘How do you handle your security deposits?’.  It will also allow you to create a check and deposit for the transfer from one account to the other (if you choose). Once you select the ‘transfer’ option, the screen will display other options allowing you to show the transfer, then to create the disposition of the security deposit.  If your accounting system is set to pay expenses from the ‘Trust Account’, you would indicate ‘I don’t make an account to account transfer’ and checks would be created for your ‘Security Deposit Account’.

Additional settings on the ‘Security Deposit Disposition’ screen are below:

Transfer Security Deposit into Tenant Ledger: This will display the total funds (as entered in your Tenant Ledger information) that will be temporarily credited to the Tenant Ledger. Typically, this is the full amount of the original received ‘Security Deposit’ entered. The purpose of this step is to show that money was transferred out of escrow (your ‘Security Deposit Bank Account’) and back into the Tenant’s Ledger.  You can prompt the program to create a deposit into your Operating Account (if you choose).

Subtract any amount that you want to charge the Tenant: This section will allow you to subtract the amount of any expenses incurred that you want to deduct from the Security Deposit prior to creating the refund.  If you have posted the expenses previously into the Tenant Ledger when paying Vendors for repairs (for example), you would skip this step.

Note:  If you have posted the expenses for repairs into the Unit Ledger, this section will allow you post a ‘Forfeited Deposit’ into the Unit Ledger for those expenses by placing a check mark at ‘Click here to forfeit this amount to the Owner (Unit Ledger). Once selected, the screen will include the information of the amount forfeited and the Account Defaults that will be used.

Tip:  If you create checks to your Vendors for payments of Work Orders or repairs to the Units that are being vacated and you post those expenses to your Unit Ledger, you would want to allow the program to create the ‘Forfeited Deposit’ posting to the Unit Ledger to offset those expenses.  If you create the checks to your Vendors and post those expenses to the Tenant Ledger, you would not forfeit the funds to the Owner, but utilize the remaining funds (not refunded) to offset the expenses.

Refund the remaining Security Deposit to the Tenant Ledger: This is the final amount to be refunded to the tenant. If you want the Tenant File to create a check to the tenant, just click the ‘Create Tenant check’ box and enter the tenant name and any remark that you want to show.

Important Note:  Prior to using this feature, you must make sure that all of the required accounts are set up under PREFERENCES > ADD/EDIT ACCOUNTS.  For new users, these accounts are included in your setup.  If you have recently updated your Tenant File program to Version 8, you will need to follow the instructions included with your order to add the required accounts.  Use your own wording for the Account Names that you set up. Once the Account Names are set, you will need to click into PREFERENCES > EDIT ACCOUNT DEFAULTS and set your defaults for the new accounts.

Remember that any checks created through this process are not posted until you print the checks.

If you do not have the current Tenant File Version (and you should), you would need to manually make the transfers, postings, checks and deposits that the ‘Security Deposit Disposition’ procedure will do for you automatically. The manual entries would include posting a ‘Security Dep FROM Escrow’ (Income Account) to bring the funds back into the Tenant ledger.  If you use a separate account for your Security Deposits, you would write a check out of the ‘Trust Account’ and create a deposit into your ‘Property Management Account’.  You would then pay out any expenses incurred by the Tenant (checks created to Vendors, etc.), and then write a check (Security Dep Refunded) to the Tenant for the remaining funds.  If any of the deposit is to be forfeited to the Owner, you would post that Expense to the Tenant ledger (Tenant Deposit Forfeited) and then post that same amount to the Unit Ledger under ‘Deposit Forfeited’.   This takes into account that you are keeping your security deposits separate from your property management operating account.  If your accounting system is set to pay expenses from the ‘Trust Account’, you will still need to post the transactions in the Tenant ledger as indicated above to show where the funds were paid to.

The transfer of the Security Deposit when a Tenant moves out of the Unit should be done prior to making that Tenant ‘VACANT’ and moving him/her to the ‘Inactive Database’.

You are free to set up as many Account Categories as you wish and use your own method. Since states have different regulations regarding handling security deposits, we cannot give advice on the method you should use.

Interesting property management articles and tips