As a property owner and/or Property Manager, one of the more important ‘daily routines’ would be posting your rental income from your Tenants. In the Tenant File program, there are several ways to complete that important task – the easiest method, of course, would be to sign up with one of our affiliate companies, REVO Payments and use the Tenant File DirectPay option, which will allow your tenants to pay you online on your own website.
If you choose not to sign up with an online company, the second best way would be to utilize the POST RENT screen found from the Main Menu of the program. The following will describe the step-by-step methods for the different procedures to get the task done….
REVOPAY – With the Tenant File DirectPAY option, you will be able to set up an online payment system with your tenants, affording your tenants 24 hour convenience of paying their rent online and helping you to get your rental income in a timely fashion. Your tenants will be able to pay their monthly rental payment online by eCheck, Credit Card or even recurring payments. The payments will then automatically post in the correct Tenant File ledgers along with your Bank Register. You can even set it up to have your tenants pay the ‘per transaction fee’. Detailed information on the pricing and set up of RevoPay can be found on our website at https://www.tenantfile.com/directpay-ach-payments.html where you can view a short video of the process along with information on their monthly subscription fees.
POST RENT OPTION – Without the DirectPay option, the fastest and most flexible way to post your rental income would be to click onto the POST RENT button from the MAIN MENU. This process will allow you to post the ‘Rent Received’ income from all or selected tenants, post ‘Late Fees Received’, charge the ‘Management Fee’ for each rent payment received, post a second income posting (such as ‘Laundry Fees’, ‘Trash Pickup Fees’, etc.), create a Bank Deposit, and create a Management Fee check all on one screen.
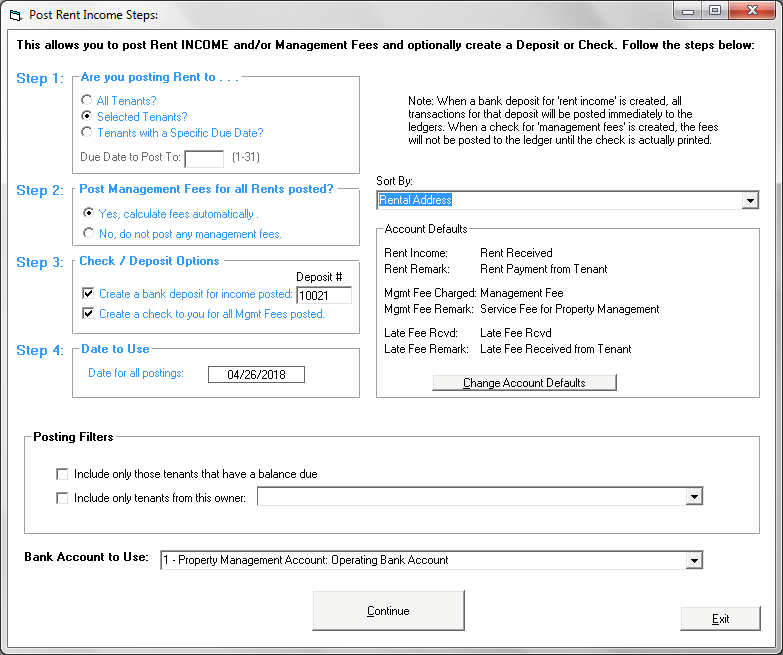 Step 1:
Are you Posting Rent to . . . – If you choose ‘Selected Tenants’, no rent amount or management fees will be entered for you (on the following screen), so that you can enter the rent received for each one yourself. The correct ‘Management Fees to Post’ will be calculated based on the rent you post (and the ‘Management Fee’ field entered in the separate Owner Ledger screens). The method of ‘Selected Tenants’ is the more common method since it gives the user the ability to enter the correct amount received for each tenant and balance to the total of checks in hand.
If you receive a majority of your rental income on the same day, you can choose to post to ‘All Tenants’ and the program enter the full rent amount for all Tenants in the program to be posted along with all ‘Management Fees to Post’ (as per the settings in the Management Fee’ field you previous setup in your Owner Ledgers). If a few tenants did not yet pay, you can zero out the amounts in the row and edit both the rent amounts and the management fees for any tenants that paid a partial rent. If you select this choice, make sure that the total of the rents to post balance to the rent checks that you have received. Remember, if you enter to post to ‘All Tenants’, the program will show that every tenant paid you the full rent ‘Payment’ as entered in the ledger.
Step 2:
Post Management Fees for all Rents Posted? – You can have the program automatically calculate and enter management fees for each rent amount posted. There are different ways to post your Management Fees in the program. If you choose not to post the fees as you receive rent, you can post the ‘Management Fee Charged’ transactions at the end of the month utilizing the ‘Automatic Posting’ section of the program.
Step 3:
Check / Deposit Options – If you are utilizing the Check/Deposit feature in the program to keep track of your Bank Account(s), you can have the program create a bank Deposit for all rents posted along with a check (to you) for all management fees posted. We HIGHLY suggest that you enter a deposit number, which will tie the deposit ledger transactions to the deposit in your Register. You might want to use the current date with no slashes, such as 180405 if the date is 04/05/2018. If you choose to have the program create a check for all ‘Management Fees to Post’, the transactions will appear in the Unit Ledgers once you print the check.
Step 4:
Date to Use – This is the transaction date that will appear on each ledger line. The settings will always default to the current date, but you can edit the field to post to a past or future date.
Sort By – You can choose the following screen to be sorted by ‘Owner Name’, ‘Property Name’, ‘Rental Address’ or ‘Tenant Name’, whichever is easiest for you to post to the correct Tenants.
Account Defaults – This information is pulled from your ‘Account Defaults’ which is a section that you will need to set up at the onset of installing the program. Be sure to check that the correct accounts are set as the default for your rent income, Management Fee expense and Late Fee income and change these if they are not correct.
Posting Filters – This section allows you to ‘Include only those Tenants that have a balance due’ or ‘Include only Tenants from this Owner’. This will allow you to limit the listing for easier posting.
Bank Account to Use – This section allows you to choose one of the ten Bank Accounts available to post the Deposit to and/or create a Check for the ‘Management Fees to post’. If will always default to the first Bank Account (which is the Main Operating Account for most users).
Note: If you have separate Bank Accounts for each Owner, select one of the Owner Names from the drop-down under ‘Posting Filter’ and then select the correct Bank Account for that Owner. If you choose to create a Deposit, all postings that you enter on the ‘Tenant File Rent Income Posting’ screen will be deposited into the Bank Account you choose in this section.
This is the posting screen that details the amounts to be posted and allows you to edit the amounts first.
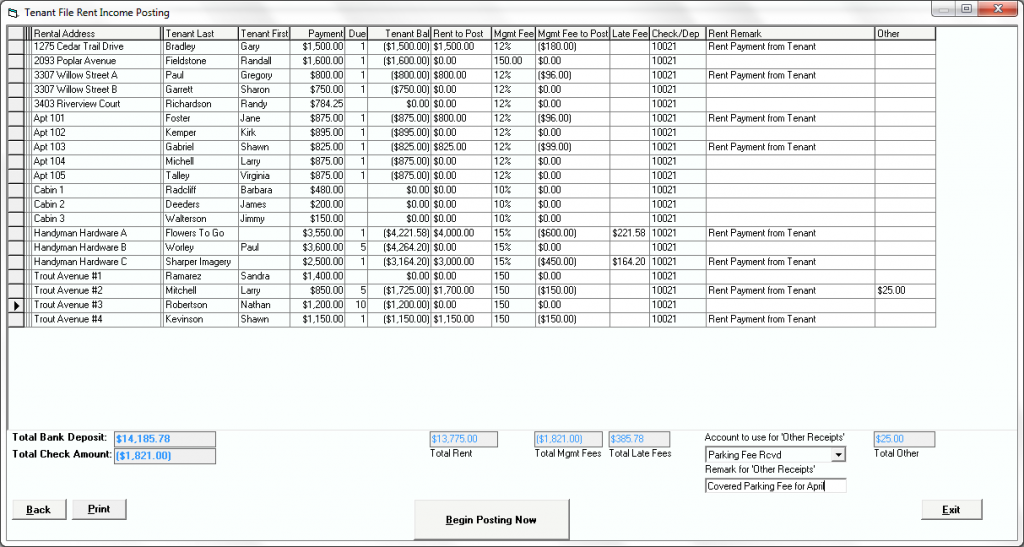 Enter the correct rental income amount received for each Tenant in the ‘Rent To Post’ column if you previously entered ‘Selected Tenants’ in Step 1. If you entered ‘All Tenants’ under Step 1, the monthly payment amount for each tenant will be completed for you in this column. Only the ‘white’ columns, such as the ‘Rent to Post’, ‘Mgmt Fee to Post’, ‘Late Fee’ Received, ‘Remark’ and the ‘Other’ column can be edited. Once you have entered the amounts from your rent checks and clicked down to the next line, the ‘Total Rent’ field will calculate and will be the total of all of your postings. This will be the amount of the deposit created, if you choose to create a deposit. It is very important that you make sure that this total balances to your checks in hand.
After you make any changes to a row, be sure to save the row by clicking on any other row above or below the current row. There is no ‘SAVE’ button on this screen. Once you make sure that the ‘Total Bank Deposit’ matches the total amount of the checks on hand, select ‘Begin Posting Now’ and all entries will be posted to the separate Tenant Ledgers from the entries on this screen. If you chose to create a deposit and a check, the deposit amount will be posted to the Register and a check will be available for printing for your ‘Management Fees’ posted.
POSTING RENTAL INCOME THROUGH THE DEPOSIT SECTION
Another method to post rental income would be to create a deposit for your rental checks. Simply click into the ‘CHECKS/DEPOSIT’ button from the MAIN MENU and change the DISPLAY (on the upper right corner) to DEPOSITS.
Select the correct ‘Bank Account’ from the drop-down Menu on the top of the screen prior to entering a new deposit and click NEW. Enter a ‘Deposit Number’, the date for the postings and a ‘Remark’. Since this would be a deposit for your rental income, you would select TENANTS under the ‘Post To Ledger’ option.
Select ‘Rent Received’ from the drop-down list in the ACCOUNT column and enter a TRANSACTION REMARK.
Select the correct Tenant’s name from the drop-down list under the POST TO DESCRIPTION and enter the amount of the rental income received. Once the information is completed on each row, click down to the next row to save the information and update the ‘Deposit Amount’ field.
If you received a Late Fee or other income, you would enter the information in the next row. Continue with each rental income check received. After all entries for the deposit are entered, click the SAVE button. Once saved, you can choose to post the deposit transactions to the appropriate ledgers immediately or keep the deposit open to add new transactions at a later time.
It is very important to remember that transactions will not post to your ledgers until you click to POST the deposit. Therefore, if you choose to SAVE the deposit and need to EDIT the information prior to posting, you MUST remember to go back to the deposit, edit any entries and/or add new entries and click SAVE and POST when complete.
As you can see, if you are utilizing the CHECKS/DEPOSIT feature of the program, it is much easier to post through the POST RENT section, however, you may need to use this method for new tenants that you are just now inputting into the program.
POSTING DIRECTLY TO A LEDGER
If you choose not to utilize the Check/Deposit feature of the program, you can post rental income directly in to a Tenant’s Ledger by locating the correct Tenant (click on the TENANTS button from the MAIN MENU and then select FIND). Once you are in the correct Tenant Ledger, click on to the ‘LEDGER’ button to view your transaction grid. Post the transaction in the first ‘blank’ line (the line with the asterisks). Click down to the next line to save your transaction. At this point, if you choose, you can print a ‘Payment Receipt’ by clicking on to the ‘PRINT’ button in the ledger.
So, as you can see, there are several ways to post rental income, so you will need to decided which one works best for you. In any case, the Tenant File Property Management Software has everything you need to keep track of rental income and expenses, so that you can spend your time making your business profitable.