As a Property Manager, you’re main goal is to keep the properties that you manage occupied by reliable tenants, handle the maintenance on the Units, contact your tenants concerning their rent payments and at times deal with evictions. That is, of course, why we have Management Fees which can be set up as a percentage of the rent received, flat fee on each rental income or a fee on all Units whether the rental income is received or not per month. The Tenant File is designed to handle any type of Management Fees that your contract sets forth. Here are some tips on posting management fees.
It is best to determine which method is best for your needs and continue with the same method so that the fees are not charged multiple times in the same month. The most efficient way (through the ‘Post Rent’ button) is to post the fees automatically each time you post rent income. In this method, each time you receive and post ‘Rent Received’, whether it is a full rent or partial rent, there will be a ‘Management Fee Charge’ right after the ‘Rent Received’ posting in your Unit Ledger. The other way is to have the program calculate and charge the ‘Management Fees’ to all Units that received a rental income throughout the month, prior to paying your Owners.
To charge Management Fees as you post ‘Rent Received’:
This is done by using the ‘Post Rent’ button from the Main Menu. In Step 2 of the section called “I want to post rent income FROM my Tenants”, you would indicate ‘Yes, calculate Management Fees automatically’ on each rent that is posted. You can even issue a check to yourself for all ‘Management Fees Charged’. You need to make sure that you have selected the correct ‘Bank Account’ for your ‘Management Fees’ check.
How to post Management Fees through Automatic Posting at the end of the month:
You can still use the ‘Post Rent’ button as in the method above, but make sure you select ‘No, do not post any Management Fees’ in the ‘Post Management Fees for all Rents posted?’ selection under Step 2. This procedure will allow you to post the ‘Rent Received’ transaction without charging the fees. That would be done at the end of the month.
If you choose to post ‘Rent Received’ directly to the ledger (without creating a Deposit) or by posting your rents as a bank deposit, you can still post your ‘Management Fees’ automatically at the end of the month (or any time) by using ‘Automatic Posting’.
Note: This procedure would be done after you have received and posted all of your rents for the month but before you have paid your Owners. Please Note: The ‘Automatic Posting’ function will create checks ONLY to the Main Operating Account.
Action: From the Tenant File Main Menu select ‘Posting’, then ‘Automatic Posting’.
Choice: If you wish to create a check to the Management Company for the total of all management fees posted, select the ‘Issue Checks for posting’ box. The program will create separate checks for each management fee posted unless you also select the ‘Consolidate Checks created’ box. If you do create a check, the management fees will not be posted until the check is printed, otherwise the transactions will be posted immediately.
Action: Under ‘Posting Options’, click on ‘Post MANAGEMENT Fee’.
Choice: Under ’Scroll by’, if you are going to scroll through each Unit one by one and decide which ones to post, and you wish change the order in which you will be alphabetically scrolling through the list of Unit Addresses, then select a different ’Scroll by’ option.
Choice: Under ‘Posting Range’, you can limit the posting to a range of names. This should not be used normally for posting management fees. If you do use this feature, the name used will be dependent on your selection in the ’Scroll by’ options. For example, if you are scrolling by ‘Unit Address’, then you could enter a range from ‘1200 Smith Road’ to ‘1590 Smith Road’. Or if you are scrolling by ‘Owner Name’ and wish to charge management fees to one Owner only, you could enter a range from ‘Johnson’ to ‘Johnson’.
Action: Click on the ‘Begin Posting’ button.
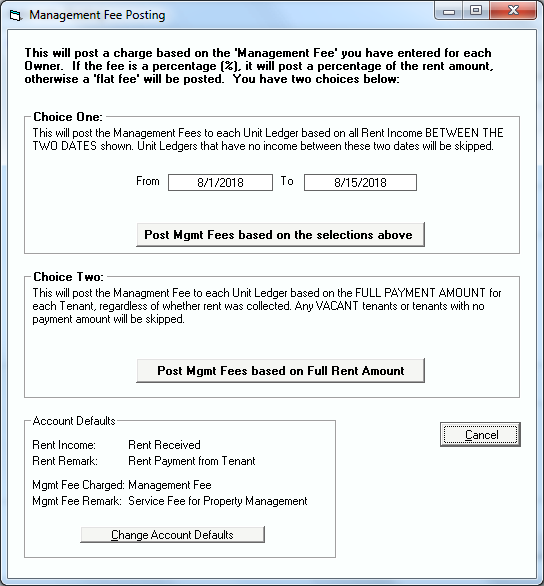
Note: You will see a screen for your choices regarding posting Management Fees. You can post the fees based on rent collected between any two dates, or you can post the management fees based on the full rent for each tenants, regardless of whether rent has been collected or not. Choose ‘Choice One’ or ‘Choice Two’ and begin posting. This will take you to the posting screen.
Action: To post to all of the Units without pausing, click the ‘Post All’ button. To post only the one item shown and move to the next one, click the ‘Post this’ button. To skip only the item shown and move to the next one, click the ’Skip’ button. You can make changes to the date or management fee amount if you are pausing at each Unit.
If you choose not to create a check for the management fees posted at this time, you can create a check later through the ‘Add/Edit’ Checks selection under ‘Checks/Deposits’. You will need to be sure to select ‘None’ under the ‘Post To’ selection when creating a check. To get a listing of all ‘Management Fees Charged’ that were posted to the ledgers for any date range, run the ‘Account Listing’ report, by entering the ‘Include Dates’ for the date range, the Include Range (i.e. ‘Management Fee Charged’), and clicking ‘Print Report’. Note: If you do not have the program create the check when posting the fees and choose to create a check posted to ‘None’ at the end of the month as indicated above, there will be no ‘split detail’ attached to the check for the separate ‘Management Fees Charged’ transactions.